
80/20 Van Galley Drawers - How To Guide
Building your full camper van galley out of 80/20 extruded aluminum is a challenging process, but figuring out how to mount your 80/20 drawers to the extruded aluminum can really add to the complexity. In typical wood framed drawers, drawer slides are simply screwed into plywood cabinet walls. Simple, right!? However, the difference when you are framing with aluminum is that you will have to substitute those screws for bolts. Luckily, it is quite simple from there and you can mount each drawer slide with just two unique bolting techniques. We are going to fully equip you with them today – Let’s get into it!
This guide will cover:

** Disclaimer: This blog post contains various affiliate links that provide a small kickback to us, at no additional cost to you. We truly appreciate your support if you choose to purchase through these! **

Why 80/20 Aluminum Extrusion for Van Builds?
We’ve DIY-ed 2 camper vans now with 80/20 aluminum extrusion. It is an ever growing van build material of choice for professionals and DIY folk alike for the following reasons:
- Weight efficient
- Incredibly strong for a slim profiler
- Long lasting
- Secure mounting and assembly (your tiny home will go through an earthquake a day!)
- Few tools needed for utilizing it
We will leave it at that as we have developed tons of other guides you might find useful after reading through this one. Start here (after reading this, of course)!
The Ultimate Guide to
Building a Camper Van with 80/20
Drawer Box Construction
This post is primarily focused on the mounting of drawer slides to 80/20 so I will not go into box construction extensively. There are MANY options and the construction when mounting on 80/20 is no different than a standard mount on wood. The one thing to note here is that if you are using undermount drawer slides, your drawer box MUST be made to the size of the drawer slide you purchase. More details on choosing drawer slide length below.
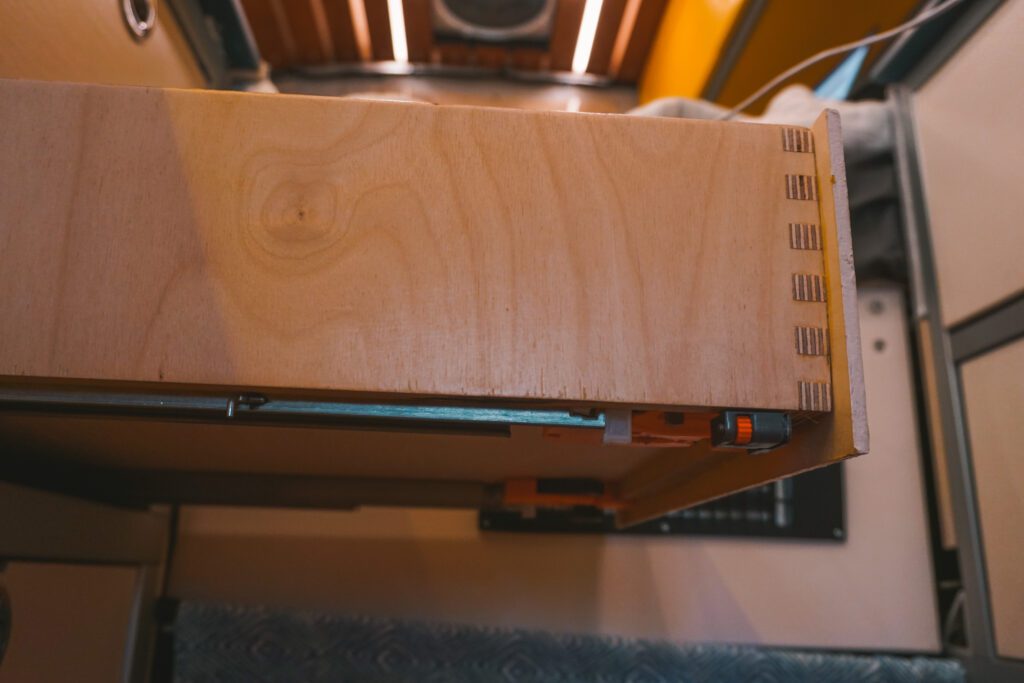
For those with limited tools, using a Kreg Jig and pocket screws is a great option (see video here)! Finger joinery or even more advanced techniques can be well suited to those will more tools and experience at their disposal. Below you can see the box joint drawers that we made.
What Type of Drawer Slides are Best for 80/20 Drawers?
The first decision to make when mounting your 80/20 camper van galley drawers is whether to use under mount or side mount drawer slides. We have used both in our DIY camper van builds: side mounts in Rocket and under mounts in Rover. So, we are just going to save you some time and give you the answer on what to use: under mount drawer slides!
Under Mount vs. Side Mount Drawer Slides
We recommend using under mount drawer slides for the following reasons:
- EASE OF INSTALL:
- The tolerances of side mounted drawer slides are extremely tight. If you drawer ends up being just 1/16” too big or too small, the drawer won’t slide smoothly – requiring tiny adjustments that are difficult to get right.
- Under mount slides are much more forgiving and offer ample adjustability to give you that perfect smooth slide close.
- FEWER EXTRUDED ALUMINUM SUPPORTS:
- Side mounted drawer slides require front to back extruded aluminum supports on each side.
- Under mount drawer slides can be mounted to the vertical supports already present in your galley construction.

What Size Drawer Slides Do I Need?
Your drawer slide length will be a factor of the available space inside your van galley. Generally, to decide which drawer slide length to buy:
- Determine what depth drawer will fit inside your cavity
- Round down to the nearest drawer slide length available (standard sizes for drawer slides come in 3″ increments)
There is one important consideration to add to this: your cavity needs to be at least 1″ longer than the drawer slide. Let’s work through some examples:
- In our kitchen galley (shown above) our cavity was 23″ so we used 21″ drawer slides.
- However, if our cavity was 21″ we would need to use 18″ drawer slides because your cavity needs to be at least 1″ longer than the drawer slide.
- But if, it was 22″, we would still use 21″ slides.
A Note: Soft Close Drawer Slides
To some extent, soft close drawer slides are a personal preference, but with so few drawers actually in your camper van we think they are well worth it! Aluminum is already so much more rigid that wood so drawers slamming are going to sound that much more harsh. When installing soft close slides, do be aware that slam latches will not close with enough force to automatically engage, so if you want your latch mechanism to close without additional effort do NOT opt for soft close drawer slides. There are pros and cons to each so it truly is personal preference.
In our DIY van builds, we opted for soft close drawer slides with boat latches. We absolutely love how this combo turned out and can vouch for the effectiveness of keeping drawers closed when driving around those turns that are known to swing drawers open.
Drawer Slide Recommendations
Drawer slides span the gamut in cost and quality, so we will share options that fit all budgets. In our van build we used more generic brands, however, top of the line Blummotion drawer slides can be found in some higher end camper van builds.
- 15″ Laurey Drawer Slides
- 18″ Betesy Drawer Slides
- 21″ Betesy Hardware

Hardware + Mounting of 80/20 Van Galley Drawers
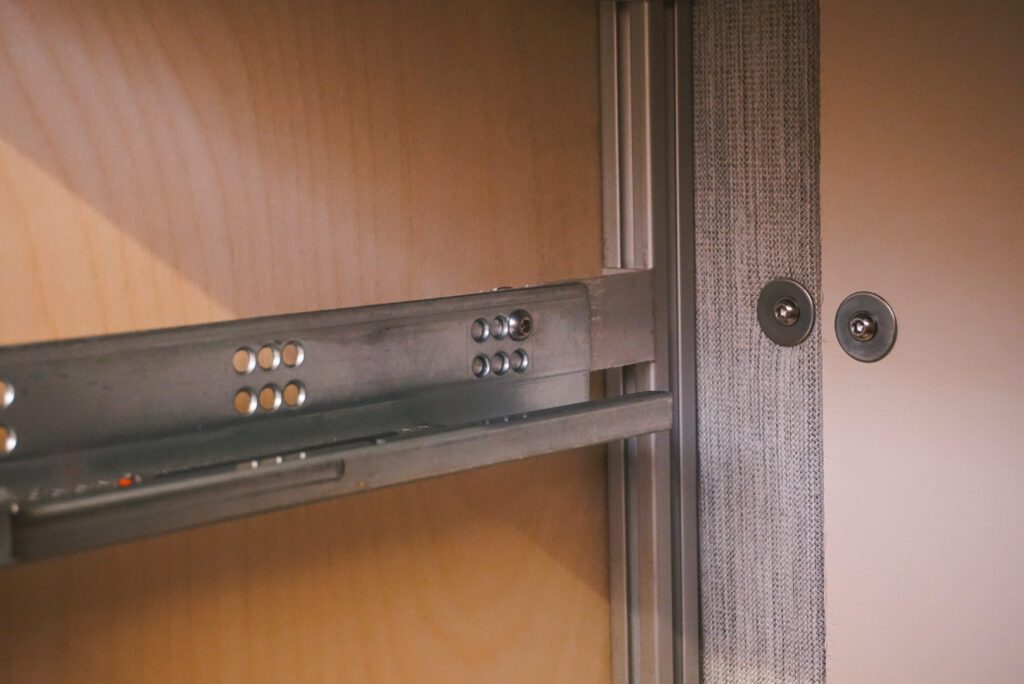
Now, for the good stuff. How do you mount drawers to your 80/20 camper van modules? Let’s get one misconception out of the way early, you do not need cross members running horizontally on your galley for under mount drawer slides. Instead, you will simply utilize the existing vertical supports by doing the following:
- Mount the front of the drawer slide in directly to the aluminum channel
- Fabricate a custom crude angle bracket in back to hold the back of the drawer slide.
Front Drawer Slide Mounting Point

The front of the drawer slide mount is the simple one so we will cover that first. The only hardware needed is:
For 15 series:
- 5/16-18 roll-in T-nut
- 1/2″ bolt
For 10 series:
- 1/4-20 roll-in T-nut
- Either size down to a 3/8″ bolt, or use a stainless steel lock washer as a spacer
With the proper nuts, and bolts, do the following for your first mounting point:
- Widen the top, front most, pre-drilled hole in your drawer slide (photo above) to the bolt diameter.
- Drop the roll-in t-nut into the vertical channel, and use the bolt to lock it in place.
Remember when you tighten the bolt down for the final time, add a drop of blue Loctite 242 thread locker so it never rattles loose.
Rear Drawer Slide Mounting bracket

The rear mounting location will require the fabrication of a custom bracket, but don’t worry – it’s as simple as custom gets! All you need are a metal cutting saw for the aluminum angle and a 5/16″ cobalt drill bit to drill your two holes. Follow these steps:
- Acquire some 1/8″ thick 2″x1″ aluminum angle stock cut into pieces approximately 1.5″ wide. The short side will attach to the 80/20 profile in back and the long side should protrude forward and reach toward the back of the drawer slide (see photos above)
- Drill a bolt hole through the short side such that the long side is flush with the edge of the 80/20. For 10 series this will be directly in the middle of the 1″ side, and for 15 series this will be pulled towards the outer edge.
- Line up the long side of the aluminum bracket with any one of the pre-drilled holes on the drawer slide. Drill a 5/16″ hole through the aluminum and widen the pre-drilled hole in the drawer slide to 1/4″. Bolt these two elements together with a 1/4″-20 bolt and a nylock nut (3/4″ is the ideal length for the bolt, but up to 1″ also works).
Drawer Face Plates
All drawer boxes will need a face plate. The material of choice is largely personal preference. If painting the face places like we did, or using other plywood based options, use 1/4″ plywood for inlay drawers and 1/2″ plywood for overlay drawers.
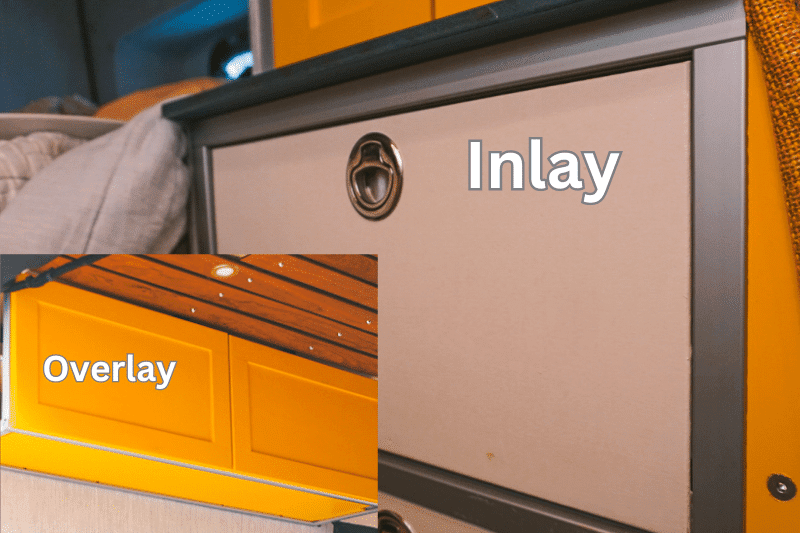
Inlay drawers
If you want the look of exposed extruded aluminum in your camper van, inlay drawer faces are the way to go. Use 1/4″ plywood so that the drawer face does not protrude beyond the aluminum frame. These drawer faces can be glued directly to the drawer once the drawer is mounted in place to your slides using wood glue. Be careful when aligning this drawer face – once the glue is dry there is no tweaking it!
Overlay drawers
If exposed 80/20 is not your thing, overlay drawer plates will hide the frame material and avoid the sterile and industrial feel that aluminum gives, while still benefiting from its strength to weight ratio in your galley frame. For overlay drawer faces we recommend 1/2″ thickness of wood. You could simply overlay, or go for a shaker style like in the photo of our upper cabinets above.

Drawer Latches
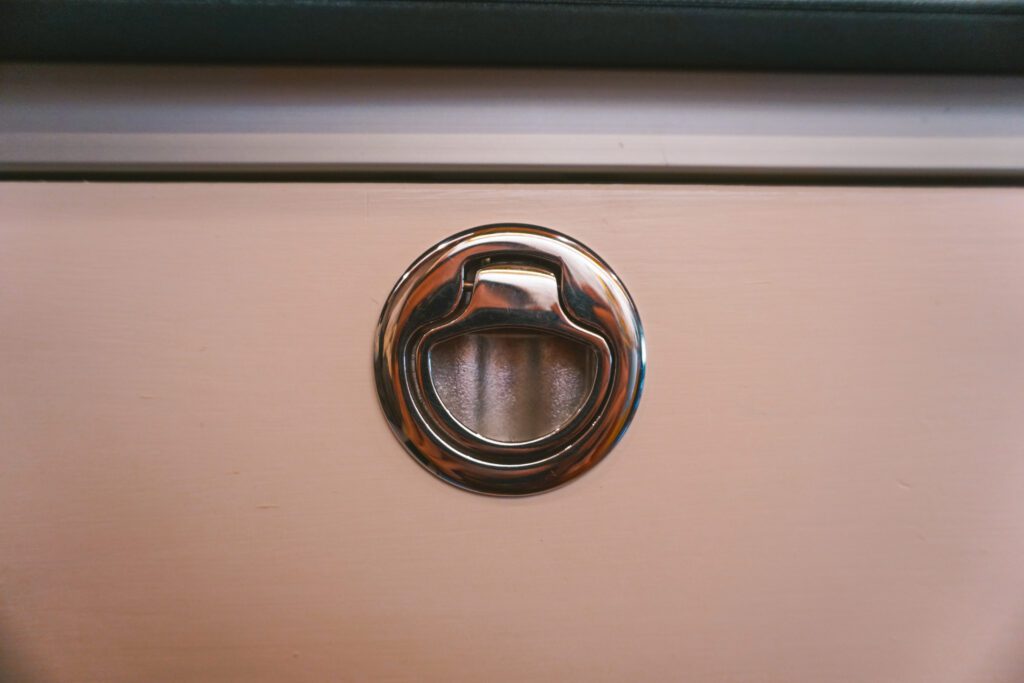
There are many latch mechanisms designed for both boats and camper vans, but we cannot stress enough the absolute need for positive catch latching mechanisms. Magnets and ball springs will not be enough to hold back your drawers from flying open on the road when you take a turn.
We opted for 2″ stainless steel boat hatch latches for the flush appearance and their tried and true durability. Identically styled latches can be sourced in plastic for about half the cost, but being plastic we cannot vouch for their durability. For us, stainless steel was not only the look we wanted, but is also on the of the most durable finish materials around! And with so few latches needed in your camper van anyways, the total cost difference was only ~$70 for a very high touch finish feature in our van.
Mounting 80/20 Camper Van Drawers Summary
As long as you choose the correct drawer slides, mounting drawers to your extruded aluminum galley will only require 2 simple mounting points using standard hardware.
We hope you feel confident to tackle this project after reading this! If not, leave us a comment and we are happy to assist further.
80/20 DIY Van Build Module Guides:
Below you can find specific step-by-step guides to building modules in your camper van with extruded aluminum. If you are looking for a starter project, the bed system, or upper cabinets are excellent places to begin.
Looking for specific assistance? We offer Virtual Consulting and love talking with our community about building vans with extruded aluminum. One of our more common consults is about reviewing your extruded aluminum designs before purchasing.
Thanks for being here! Happy building!
Eric + Colby
✉️ Join our mailing list for more content!
🙏🏽 If you are looking for more 1:1 van build help, we are here to help via Consulting or Travel Van Building.
[Start Here] Beginner Guides:


Comments 10
Hi there! I’m getting into the drawer details now. Our galley is 16″ deep, 10 series 8020. That’s 16″ overall on the frame depth. So I’m thinking 15″ drawer slides. It seems like the front edge in your photo overlaps half of the extrusion. With my dimensions, the back edge will also overlap the extrusion, but not far enough to mount it directly to the 8020. I think I’ll still need the L-bracket at the back to catch the mounting holes on the side. Does this sound correct? I appreciate your help! Thank you!
Author
Sorry for the delay – this slipped through the cracks! Your plan sounds correct – how did it work out?
Thank you for all the information you have shared. Could you recommend a aluminum cutting saw blade to use with a chopsaw? Thanks.
Author
Hi James! We find Diablo to be pretty good. Here is a 12 inch one, be sure to match the correct size for your chop saw. Hope that helps!
Hello! Great post! Awesome info!
I’d sure like to see a picture of how you made the slam latch catch work.
Building my drawers now and I’m still flummoxed by how to get my latch to where I need it to be.
Jim
Author
Hey Jim! Sure thing. Could you shoot us an email, or IG message, and we can send some pictures over.
how did you mount the catch for the slam latch?
Author
Hey Sid, you mount the catch on the horizontal cross member of extruded aluminum that runs above the slam latch. We used 1/4-20 roll in t-nuts, bolts, and lock washers. You may need to drill out the holes on the catches a little bit. Be careful with your latch placement and be sure it catches in the right position before adding thread locker to the bolts.
Thank you! You have inspired me to continue with my build.
Author
We believe in you!!