Using Water From Fresh Water Sources as a Van Lifer
The overland community is demanding more from modern adventure vans, and the latest is the ability to filter and fill your van water tank from fresh water sources water fully off grid. This means pulling water from a non-potable lake or stream, filtering it, and pumping it into your water tank. This has taken the form of several similar and expensive van life gadgets ranging $700 to ~$1,200+ (discussed below). But, leave it to us, The Engineers who Van Life, to design a way to build these directly into you van’s plumbing system for a fraction of the cost. Not to mention the space and weight savings you’ll experience! Here’s how we did it:
** Disclaimer: This blog post contains various affiliate links that provide a small kickback to us, at no additional cost to you. We truly appreciate your support if you choose to purchase through these! **
What does this guide include?
This guide is DIY design for pulling, and filtering water from a fresh water source and dumping it in your camper van water tank. It adds on to any existing camper van water system. It includes the following:
What problem are we solving?
This DIY Water System Add-On allows you to stay off grid longer by pumping and filtering fresh water sources (streams, lakes, etc) into your camper van water system. You no longer need to rely on potable water spigots that are only in cities, and are often winterized when it is too cold. This system is how we filled our water system through the winter.
DIY "Off Grid Filter and Fill" Design Overview
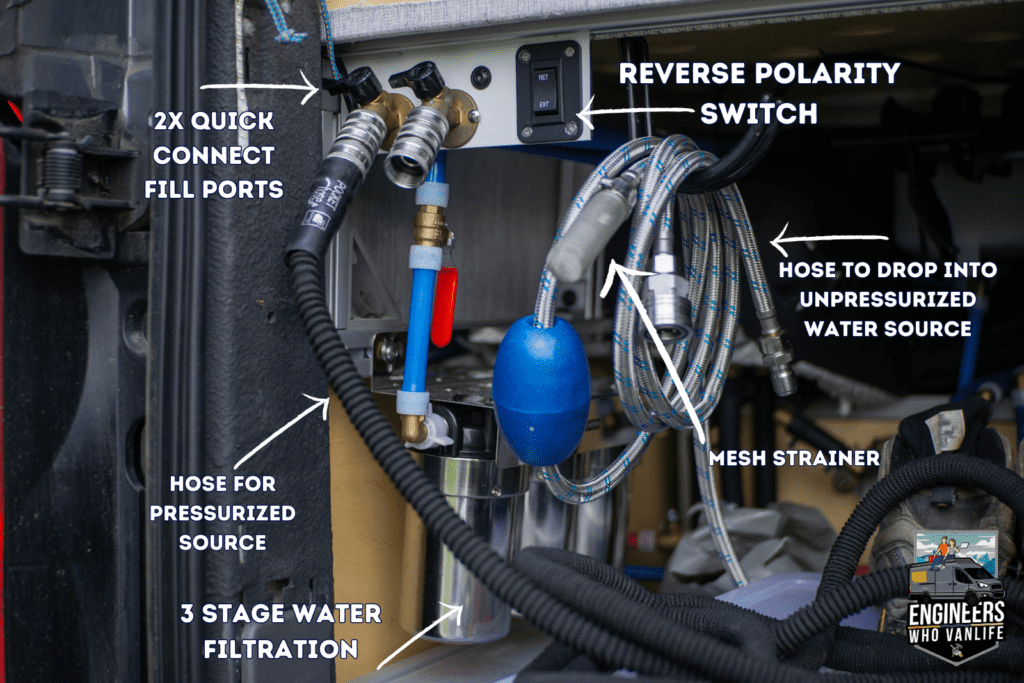
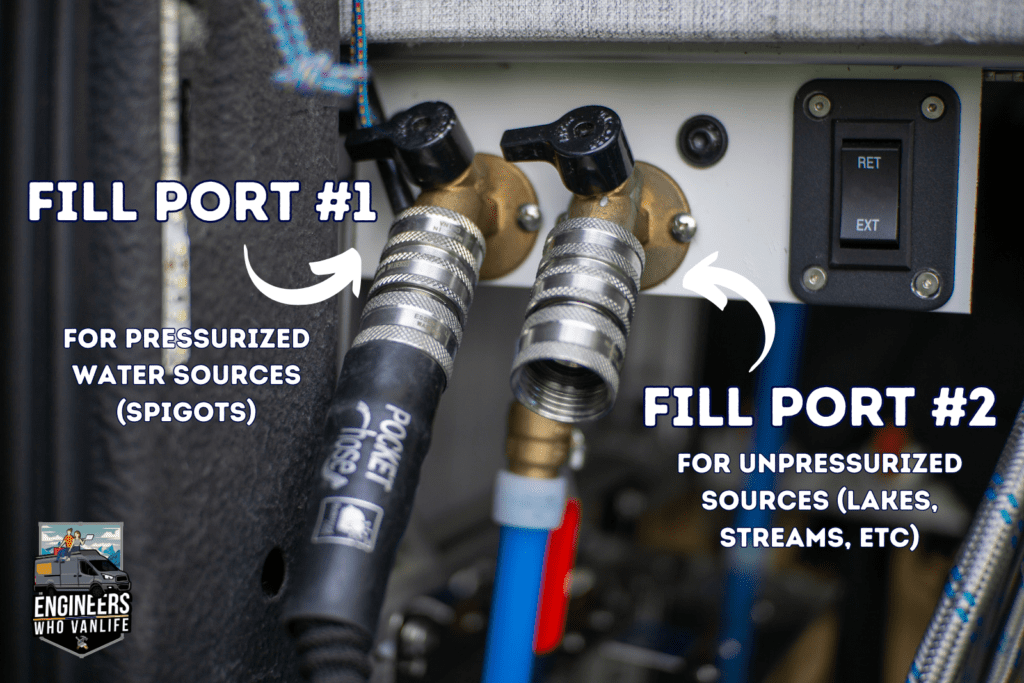
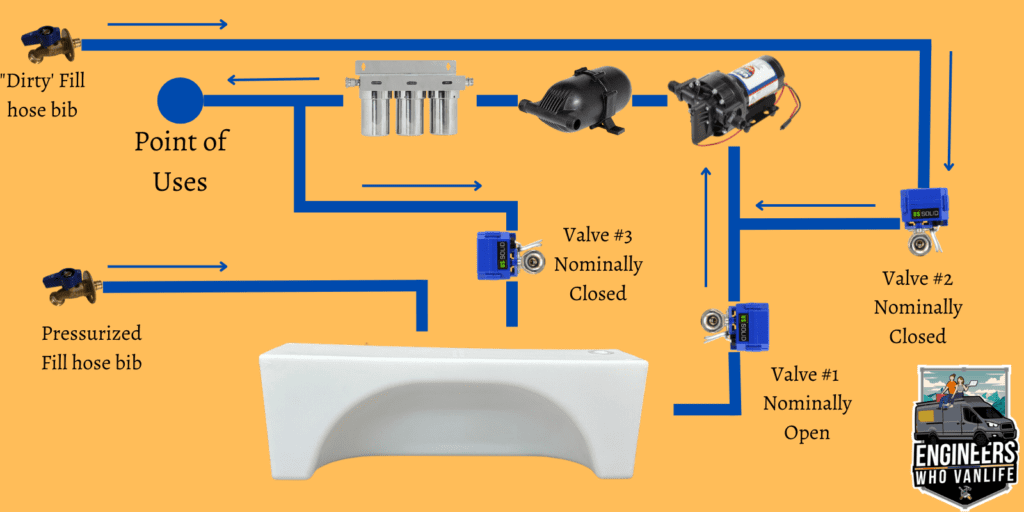
We know the problem we are solving. But, how are we going to do this? We are going to create an add-on to your existing water system that results in TWO fill options:
- In Standard operation mode you fill your potable water tank using fill port #1 from any pressurized water source. This is a “normal van life water fill”. In this mode, your water pump is is pressurizing your water system as usual.
- In filter and fill mode, you use fill port #2 and flip the reverse polarity switch will trigger all three motorized ball valves. This forces your on board water pump to pull water into your tank from a non-pressurized water source. At this point your onboard faucets will lose pressure. Ensure you have your hose connected to the fill port before you press the switch as you want to minimize the amount of time your 12V water pump is priming itself for.
Out Of Box Alternatives
If you’d rather not DIY this system, you could purchase an out out box system for somewhere between $700 and $1,200. The best options are currently:
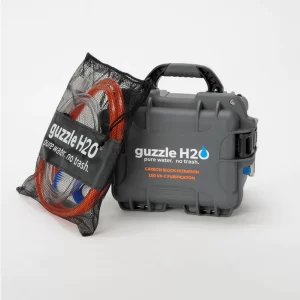
Guzzle H20 Stream Water Filtration System
- .75 gpm flow rate
- 1 um granulated carbon + .5 um particle filter
- Trusted brand with long history in RV market
BluTech ARX+ 4 Stage Off Grid Water System
- .3 gpm flow rate (we have experienced closer to 1.5-2 gpm depending on turbidity)
- Granulated carbon + .2 um particle filter
- Previously known as MRX+
DIY Filter and Fill Project Pre-Requisites
The cost competitiveness of this project relies on the fact that you already have an onboard water pump and filter set as part of your campervan’s water system. We are not including these costs as part of the system because your water system should already include them.
On Board 12V Water Pump
Your 12V water pump will be doing double duty in this setup:
- It will pressurize your water system as normal.
- It will pump water from a lake or steam and fill your tank.
Don’t worry – we will explain how that happens later.
Three Stage Water Filter
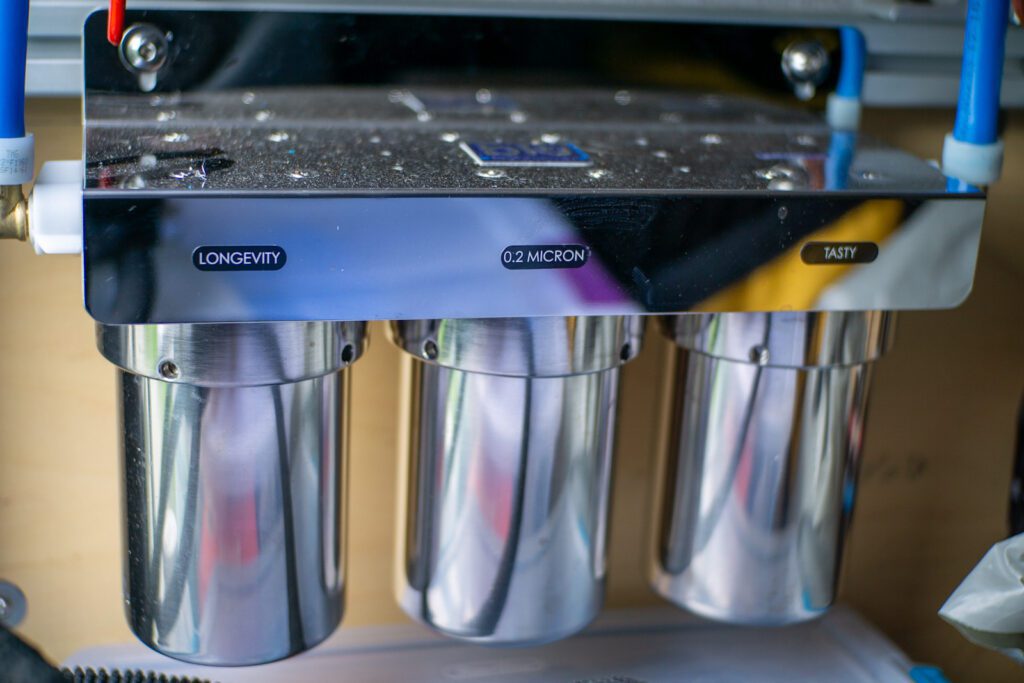
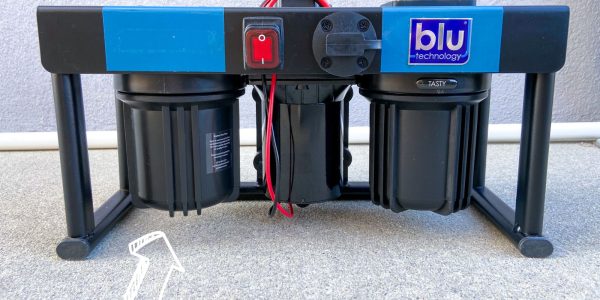
We recommend three stage water filters over two stage water filters for filter longevity. These filters will (1) work to filter water after it leaves you tank and as it is delivered to your point of uses, and (2) filter water after it is picked up from the lake or stream and before it is dumped into your tank. This means that your fresh water tank will always have clean/filtered water in it regardless of where you fill from.
Here are two of our favorite 3 stage water filters to include in your water system:
- Blu Tech Trio ($300 – 5″ filters) shown below
- 5% off with code “engineerswhovanlife”
- ClearSource ($500 – 10″ filters)
"Off Grid Filter and Fill" Project Parts List
You will need to following parts to complete this DIY filter and fill off grid water system. Choose the correct variety of PEX to match your existing plumbing plans.
- 3x Motorized ball valves – reverse polarity
- Reverse Polarity Switch
- 6x 1/2″ NPT male to PEX. PEX-A. PEX-B.
- 2x Garden hose bibs to PEX. PEX-A. PEX-B
- 2x Quick connect sets
- Extra brass 90 degree elbows. PEX-A. PEX-B.
- Extra PEX tubing. PEX-A. PEX-B.
- Extra PEX sleeves or crimp rings. PEX-A. PEX-B.
Execution: How to DIY This Off-Grid Filter and Fill Capability
For DIY van builders, it makes sense to add this overlanding capability during your van build phase for a fraction of the cost rather than buy an expensive van gadget in the future. It will save you money, space, weight, and it’s just a fun project to take on. If you’re a project person like us you will really enjoy it! However, if this project is coming to your attention after your van build is complete, you should be able to add it as long as you have a little extra space. We added ours after about 7 months on the road.
Normal Plumbing Schematic for Your Adventure Van
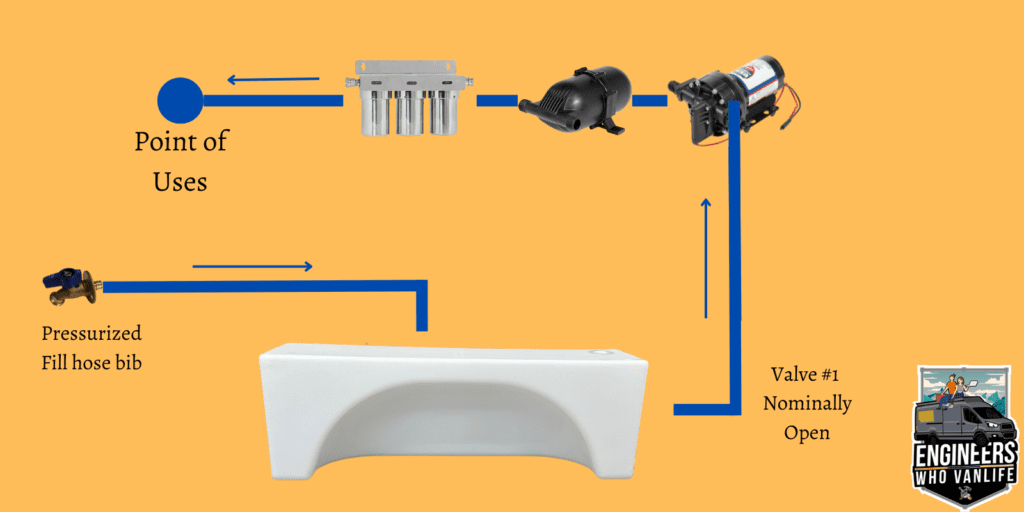
In a normal adventure van plumbing schematic there will be one inlet into the fresh water tank for filling, and a second outlet for pulling water out of your tank. This will include a 12V water pump, accumulator, and a set of water filters before the water is distributed to it’s points of use. It will look something like this:
Off Grid Filter and Fill Plumbing Schematic for Your Adventure Van
This “filter and fill” modified plumbing schematic adds the capability to pull and filter water out of any stream, lake, or unpressurized water source and fill your fresh water tank.
- When in normal operation mode the water system acts exactly as the above “on-grid” plumbing schematic.
- When in “Off-Grid” mode valve #1 closes and prevents water from being sucked out of your fresh water tank. Valve #2 opens and reroutes the suction to the “Dirty Fill” hose bib, which will have a hose submerged in the water source is is drawing from. Finally, valve #3 opens and provides a path for the filtered water to be deposited into the fresh water tank.
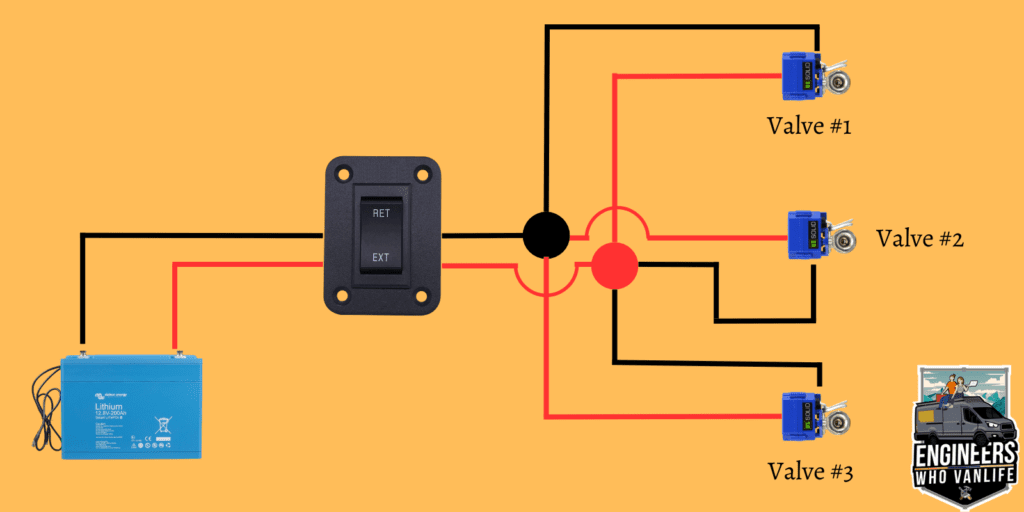
Refer to the wiring diagram below on how to wire the three valves to a single switch.
Choosing The Correct Ball Valve Type
To pull off the plumbing system reroute you will need three (3) reverse polarity motorized ball valves. Two of them will be installed in a nominally closed state, and the third will be installed in a nominally open state.
**Be sure to purchase reverse polarity motorized ball valves. Do not purchase a solenoid or valves with an auto-return wiring setup! We share why these do not work below:
Motorized Ball Valves VS. Solenoids
Electric ball valves use a small bit of energy to switch positions and then turn off once they have reached the opposite state. This ensures they do not heat up and potentially burn out if being held open for an extended period of time. Solenoids are actively held open with a small bit of power and are only designed to be opened temporarily and are then “released” closed when power is shut off.
Reverse Polarity VS. Auto-Return Ball Valve Types
Motorized ball valves are purchased in one of two DC wiring configurations:
- Auto return wiring is designed to be used with an on/off toggle switch. With no power the valves will close, and with power the valves will open. This will NOT work as we need the valves to stay in both positions for each operation mode.
- Reverse polarity wiring will trigger the ball valve whenever the positive and negative wires are flipped – achieved with a reverse polarity toggle switch.
Because this project has some valves in a nominally open and some in a nominally closed state, reverse polarity ball valves are required. With a single switch, some of the valves will move to the open position and some will move to the closed position.
Reverse Polarity Switch
Most van builds use on/off rocker switches. However, for this project you will need a reverse polarity switch. It looks complicated at first, but we promise you it’s not! We tested three different reverse polarity switches and found this switch to be the best. We liked the momentary automatic reset action, slim profile, and metallic base plate.
Wiring Diagram For Motorized Ball Valves + Reverse Polarity Switch
Wire ball valve #1 in a nominally open state. Wire ball valves #2 and #3 in a nominally closed state. It is okay to connect red wires to black wires for this circuit.
Finish The Project With a Slick Fill Port Interface
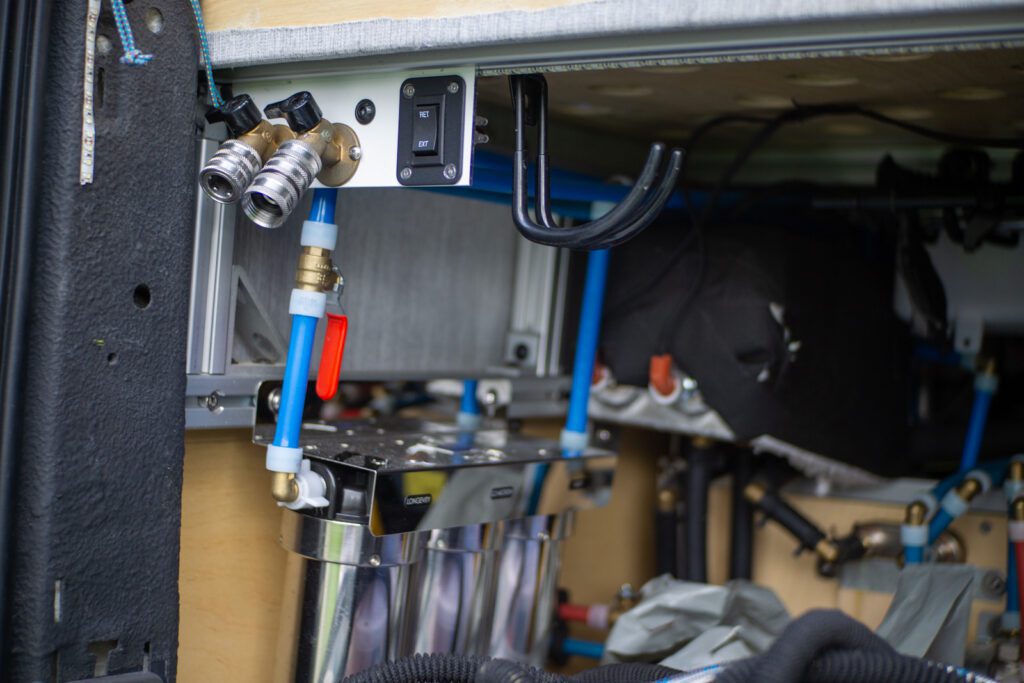
You can put your reverse polarity switch and both of your fill ports on a single interface panel just like we did. We used a piece of scrap 3″ wide, 1/8″ thick aluminum bar stock and bolted it our 80/20 Bed System with a couple of two hole corner brackets. The scrap piece we found was already spray painted white which we really liked – you can choose whatever color you wish.
A Note On Quick Connects and Hoses
There’s nothing better than adding quick connects to your water fill ports. These allow you to more effortlessly switch between filling from a pressurized source to filling from an unpressurized dirty source. No need to screw and twist your hose to the fill port. Additionally, quick connects allow you to get a perfectly watertight connection as opposed to screw on hoses.
Hose Selection
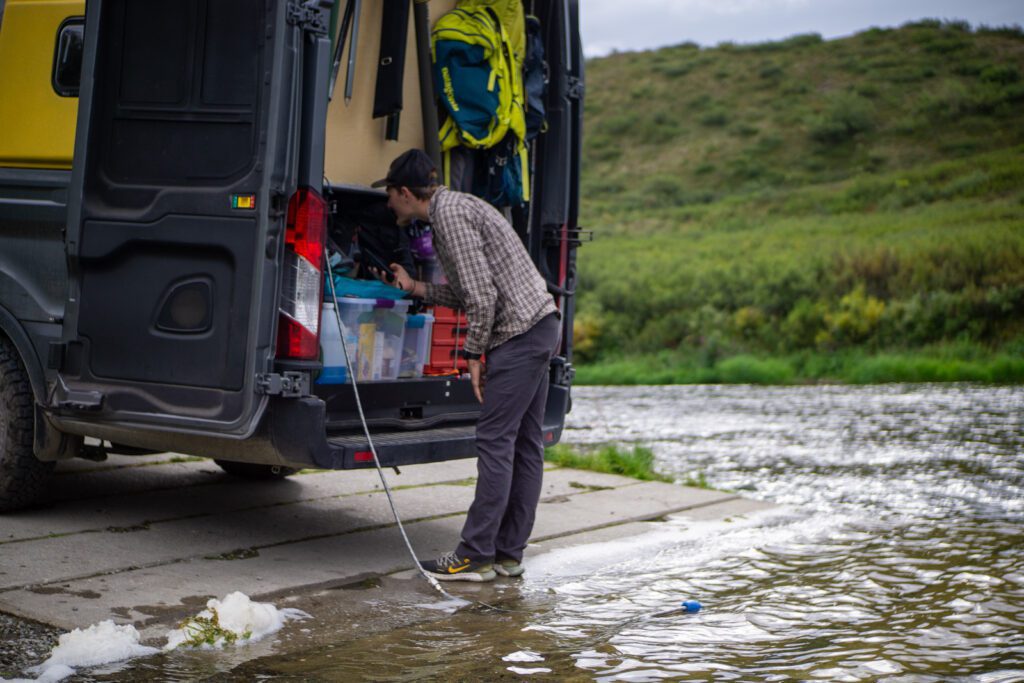
Short hoses work best for filling from dirty water sources as they minimizes the amount of hose that has to be primed by the 12V pump. Expandable hoses may not be able to be primed at all due to the high water pressure needed to overcome the hose elasticity.
Here is a great 10 foot hose option! Put this strainer on the end of it for best results to prevent large debris from being sucked into your 12V water pump and to extend the lifespan of your water filters.
Cost Analysis
$99 – 3x Motorized ball valves – reverse polarity
$12 – Reverse Polarity switch
$5 – Extra wiring materials
$50 – Various PEX-A Brass fittings – about half the cost if using PEX-B [ PEX-A // PEX-B ]
$10 – Additional piping and PEX sleeves/crimp rings [ PEX-A // PEX-B ]
$15 – Additional Garden Hose Bib to [ PEX-A // PEX-B ]
$25 – Stainless Steel Quick Connect Sets
$12 – 10 ft Hose
$9 – Mesh Strainer for Hose
——-
Project Total: $237
All in, this project should cost you ~$237, which is a third of even the cheapest comparable off the shelf solution! Not only that, you will probably have extra PEX tubing and many of the fittings left over from the rest of your water system install so the costs you incur could be less than $200.
How We Use Our Off Grid Water Addition - An Anecdote
Gone are the days of water anxiety for us! Lots of places we have been staying in Alaska have been right down by either a lake or stream and we love NOT having to conserve on water while doing dishes and showering. That’s right – we’re taking full 5 minute HOT showers out in Alaska, and it is LUXURIOUS! We’re doing the Denali Highway right now and are fully off grid for a whole week with absolutely no services, and an addition like this is making the experience so much more comfortable.
Related Reading
101 Guide to Camper Van Water System
Thanks for being here! Happy building!
Eric + Colby
✉️ Join our mailing list for more content!
🙏🏽 If you are looking for more 1:1 van build help, we are here to help via Consulting or Travel Van Building.
[Start Here] Beginner Guides:







Comments 8
Regarding the Guzzle H2O Stream and ARX+, do you feel that their ability to filter and purify safe drinking water is roughly on par? Taking away the size of the ARX+ and its carrying case, do you feel that the increased cost of filters and the potential for more frequent changes negates the cost advantage over the Stream? Thanks, great post!
Author
That’s a good question, honestly it is probably splitting hairs between the two. If you are truly filtering from streams and lakes often, you are probably going to have to change filters for either system often!
Hey! super cool article. you mention in the article that the water in the tank is filtered regardless of where you get it from, but in the diagram, the water is not filtered before entering the tank when filled in normal operation. I understand it gets filtered later regardless, but I’m wondering if the current setup means bad stuff can grow in the tank. If the current setup was changed so the pressurized inlet would feed to the filter before going into the tank, I think you’d always have clean water in the tank. what i was curious about though is if there is an issue running “dirty” water through “clean” lines. does it matter? thanks for your input.
Author
Sorry for the delay, just seeing this! When we say “clean / filtered water always in the tank” – that is because pressurized sources are potable and should be clean! All water LEAVING the tank goes through the filters. The reason we do this is because the dirty “un-pressurized” water does touch some of the same lines at the water coming out of the tank. Therefore, if you have clean and dirty water touching the same lines, you would want to make sure they hit the filters one more time. I hope that helps!
Awesome article. I’m curious if you needed to add an additional ball valve to prevent the ‘dirty’ water from entering the water heater cold water intake?
Author
Hello! We would recommend putting all points of uses (includes water heater, sink, etc) after the output of the filters so this is not an issue.
Hey guys!
Love your work keep it coming. What are your thoughts on filtering the gray water tank in an emergency where a water source is not available? I have implemented your fresh water source setup on my rig. But where did you get the Blue float for your hose? Maybe think of adding it to the current build sheet? How would you add it to the/my current freshwater retrieval system?
Many Thanks!
Author
Hey Peter! We have never filtered grey water – with all the bacteria from meat, hand washing etc, you would want to be SUPER confident in the filters and want to filter as fine as possible. What we have seen is recirculating “grey” water for use in a shower or any thing that you wouldn’t consume. It’s probably clear from our strategy that we would rather filter fresh water sources before anything else 😀 Super cool to hear that you have implemented it! The blue bob came on the hose that we used – Blu Tech 5″ water inlet hose. You could probably DIY this with something from a craft store. I am not able to find anything similar on Amazon…