
Extruded Aluminum (80/20) Campervan Bed System
Extruded aluminum (80/20) is a lightweight and strong building material that can cut the overall weight of your van build and provide unparalleled durability to your rig. While you can build almost anything in your van with it, an 80/20 campervan bed system is the perfect starting project to get you familiar with the material.
Why use 80/20 for your campervan bed system?
There are several benefits of using extruded aluminum instead of wood specifically for your bed:
- Less Condensation Issues: Your bed is an area of high condensation which creates a high likelihood of mold with wood if not sealed extensively.
- More Spacious Garage: Because of the high strength of 80/20, you can achieve a full span across the width of your van without any vertical supports. Also, you will be able to repurpose the lengths for mounting your electrical and water system components.
- Simplicity: Your bed system is composed of only three simple lengths and two bracket types. This makes it one of the simplest modules to plan and put together in your van and is a great introduction to working with extruded aluminum (80/20) in your van build.
** Disclaimer: This guide contains various affiliate links. These links provide a small kickback to us, at no additional cost to you. Thank you! **
Our Other 80/20 Van Build Guides
We have built 2 camper vans out of extruded aluminum, and helped countless others! After reading through this guide, we recommend checking out some of our other 80/20 van build guides for your next project! We have one for almost everything you will need.
- 101 Guide to Building a Camper Van with Extruded Aluminum
- Camper Van Cabinets
- Perfect 80/20 Drawers
- Galley Schematics + Design
- Shower in a Bench
- Fastening Panels to 80/20
A note on dimensions for this project
For the lengths described in this guide, we will consider a bed going East/West in a Ford Transit van. If you have another model van, or want your bed to go North/South, you can apply all of these same concepts and modify just a few of the length dimensions to accommodate your custom van design.
Parts List for 80/20 Campervan Bed System
- 4 x 55” Top and Bottom Side Rails ( part #1515-LS)
- 8 x 6” Vertical Supports ( part #1515-LS)
- 3 x 67” Full Length Bed Spans( part #1515-LS)
- 4 x Gusted Corner Brackets ( part #4336)
- 22 x 2 Hole Corner Brackets ( part #4302)
- 60 x FBHSC Bolt Assemblies (part # 3320)
- 4 x Roll in T-nuts ( part #13040 ) (hold plywood platform down)
- 4 x 7/8” countersunk 5/16-18 bolts (hold plywood platform down)
- 5/16-18 Plusnuts (minimum of 10, we used 14)
- 5/16-18 2.5″ Socket Cap Bolts (same # as plusnuts)
- Plusnut install tool
- Spacer / shim material (we used 1/2″ delrin)
- Plywood, or other ventilated bed platform
We have partnered with 8020.net to bring our van building community a discount! By clicking through any link on this page, a 5% discount will automatically be applied to your cart.
How to Build Your Bed System with 80/20 Extruded Aluminum
Your bed system will undoubtedly be a weight bearing application, so all 80/20 profile lengths will be 15 series extruded aluminum if you are working with the imperial system, and 40 series if you are working in metric. For this blog post, we will move forward using the imperial system because 80/20 Inc is a US based company and sells primarily within the US. However, if you want to work with metric series you can follow along easily and choose the metric series hardware and brackets. Feel free to reach out to us with clarifications.
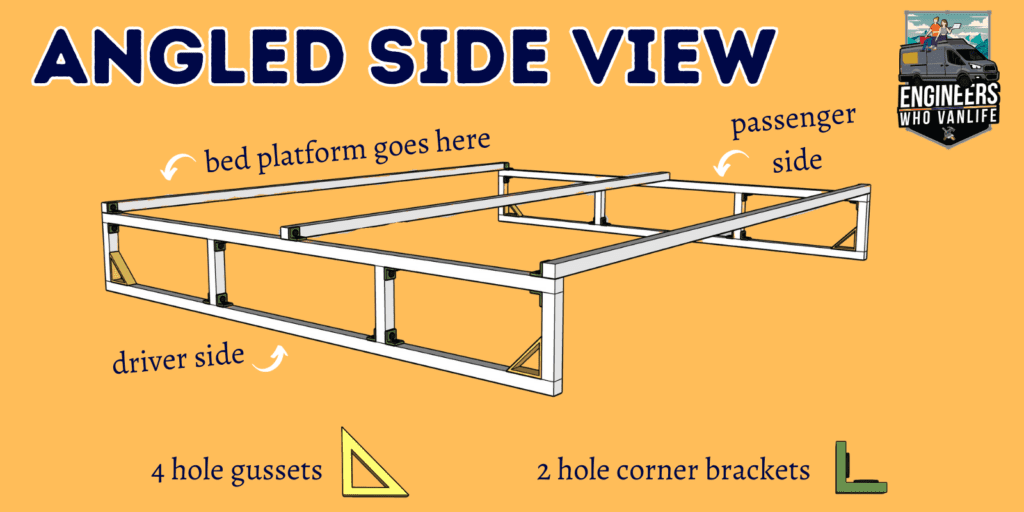
The 80/20 campervan bed system is simple:
- Build two rectangles on each side of the back of your van
- Add 3 lengths running across on top of them.
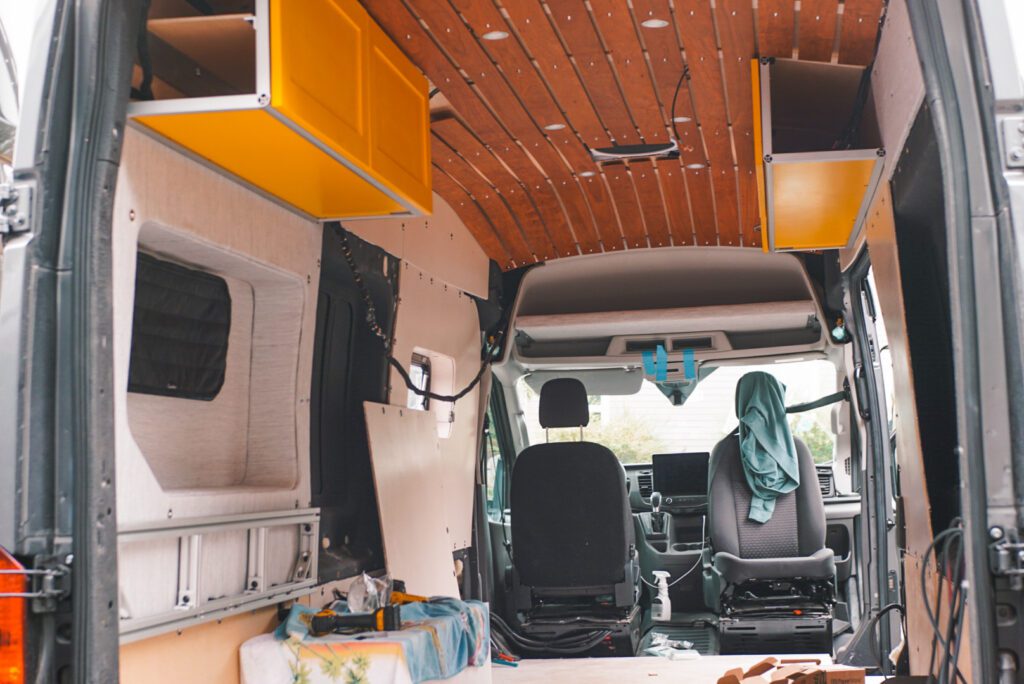
Shown below, you can see the driver side bed support.
80/20 Campervan Bed System Base (Bottom Side Rail)
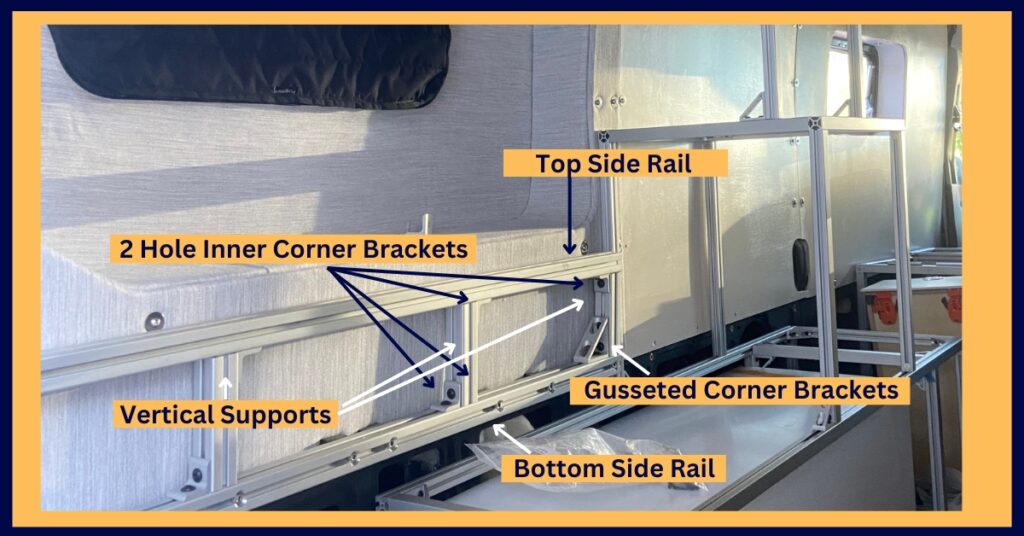
The first thing you will need to do when building your 80/20 bed system is mount a bottom side rail on each side of your van. This bottom side rail will be approximately the width of your bed, minus the width of the pillar in the back of your van. In the Ford Transit, for a queen sized Flarespace Baja mattress, we used a 55″ length member of 15 series Lite.
To mount this rail, use 5/16 – 18 plus nuts and 2.5″ socket cap bolts to secure the 80/20 length to your van walls in a minimum of 5 places. We bolted ours in 7 places for good measure using the Ford Transit’s pre-determined holes for each of our plus nuts. Using a drill press and a 3/8” Cobalt drill bit, precisely drill through the middle of the 80/20 support for each of your bolt hole locations. Using the drill press and a large step bit, widen the insides of the T-channels such that your bolt head can be accommodated and recess in to the T-channel.
There is a funky curve in the Ford Transit vans that will cause your rail to bow inwards if you do not use a spacer. Make a 1/2” shim out of 1.5” square delrin from McMaster Carr to make this spacer. Simply drill a 5/16” hole in the center of the delrin spacer. Now that you have your delrin spacers and side rail cut and prepared, bolt it to your wall.
Define your Bed Height (Vertical Supports)
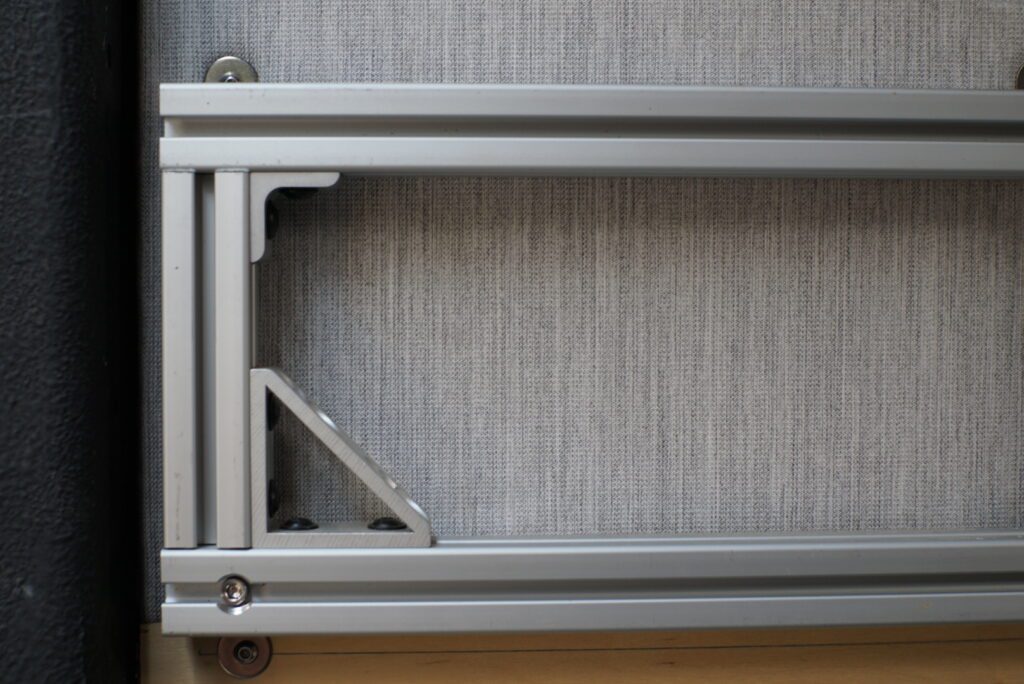
From the bottom side rail you just installed, you now need to add 4 vertical supports. These should end where you want your bed to start minus 1.5 inches where the top rail will sit.
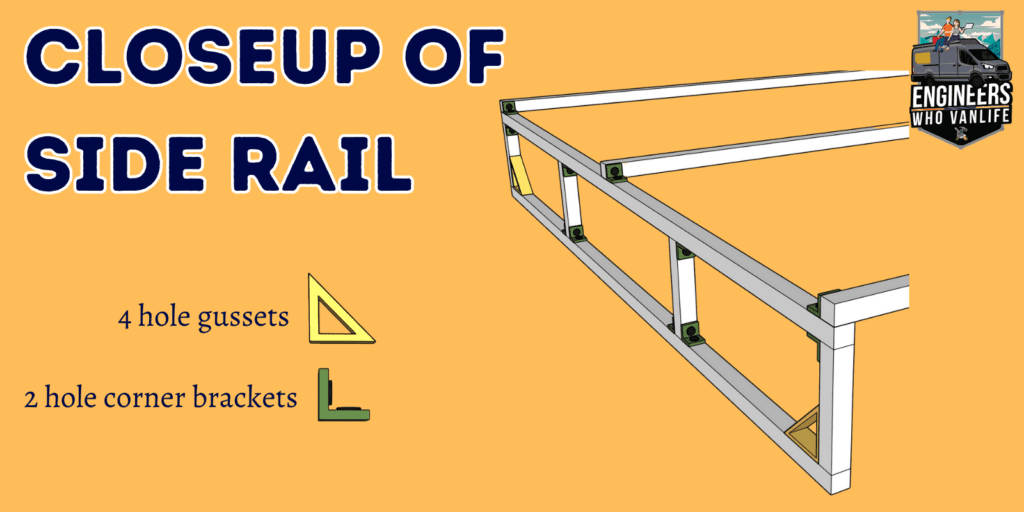
Because we were using flares and wanted our bed higher, we used 6″ vertical supports. This brought our bed height exactly to the bottom of our Flarespace Flares. Cap these vertical supports with a top side rail to make a rectangle. On the two bottom corners for each rectangle, use heavy duty gusseted 4 hole corner brackets. And, for the top two corners, use 2 hole corner brackets. See below. For the middle vertical supports you can also use the more economical 2 hole corner brackets. For all bracket types, you will use the standard flange bolts and either economy t-nut assembly.
You have now raised your bed supports to the proper level!
Complete Your Bed Structure with Cross Members
The final step is to create those long spans across your entire garage that your plywood bed platform will rest on. Three of these supports are needed, and in the Ford Transit they need to be 67 inches. These full length bed supports rest on the two rectangles you just created and are secured using standard two hole corner brackets to the top rail. They should be evenly spaced across your bed.
Ventilated Plywood Bed Platform
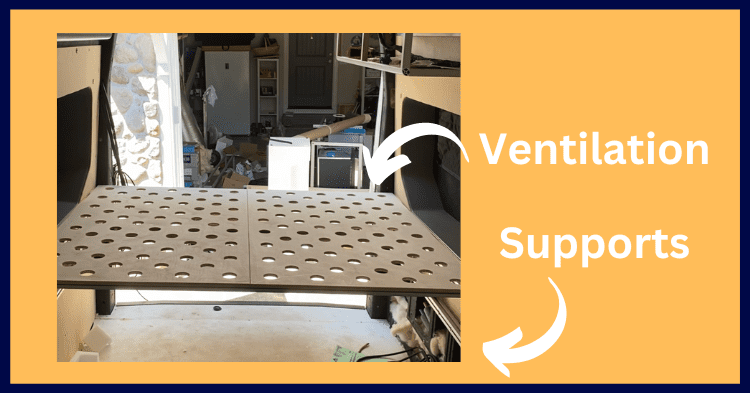
Now that you have the necessary 80/20 extruded aluminum bed system, you can continue with your plywood bed platform. 1/2” plywood is plenty strong, and ventilation holes can be added at your desired frequency with a 2 1/2” hole saw dozer. Starting the hole from one side and finishing it from the other will prevent tear out, and you can round off all your edges with a round over router bit.
Where you could make your bed platform out of a single piece of plywood, it is awkward and difficult to maneuver that large piece into place. Instead, split your bed platform into two pieces so they are much more manageable to work with. With the two pieces of your bed platform completed, anchor each of them to the the 80/20 support using a roll-in T-nuts and 7/8” countersunk bolts. Each half of the bed support should have at least two anchor points on the plywood.
Don't Forget! Loctite!
As with any project you do with 80/20 extruded aluminum, the last thing you need to do is put a drop of blue loctite 242 thread locker on every single one of your bolts. This will prevent the bolts from vibrating loose as you drive. Trust us – this is guaranteed to happen if you skip this step and you will regret it when you start finding loose bolts on the ground and your modules start to squeak!

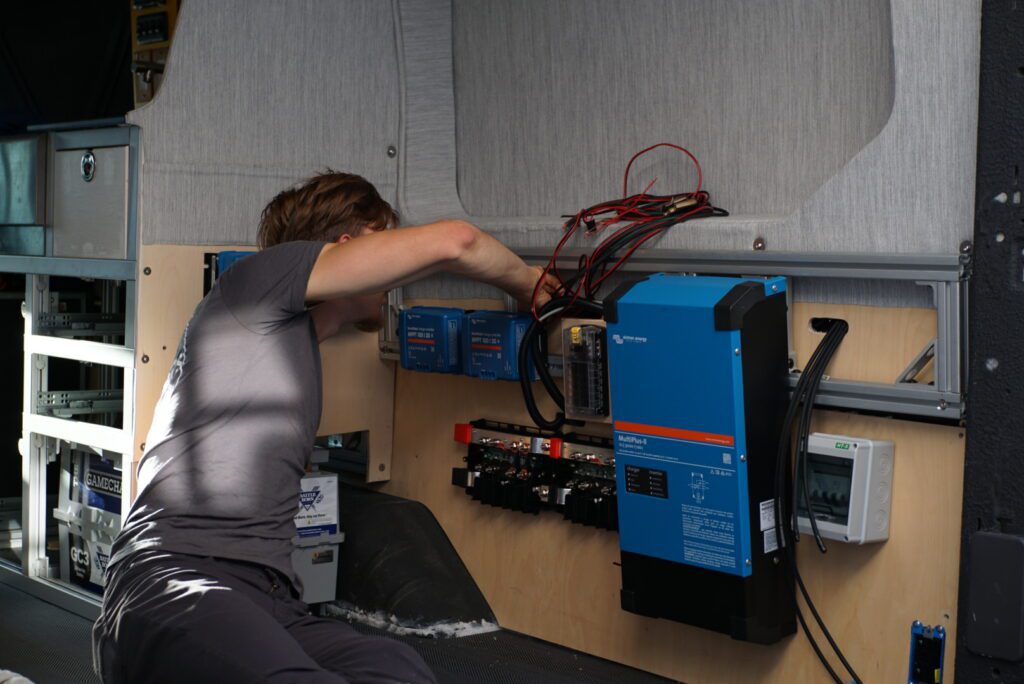
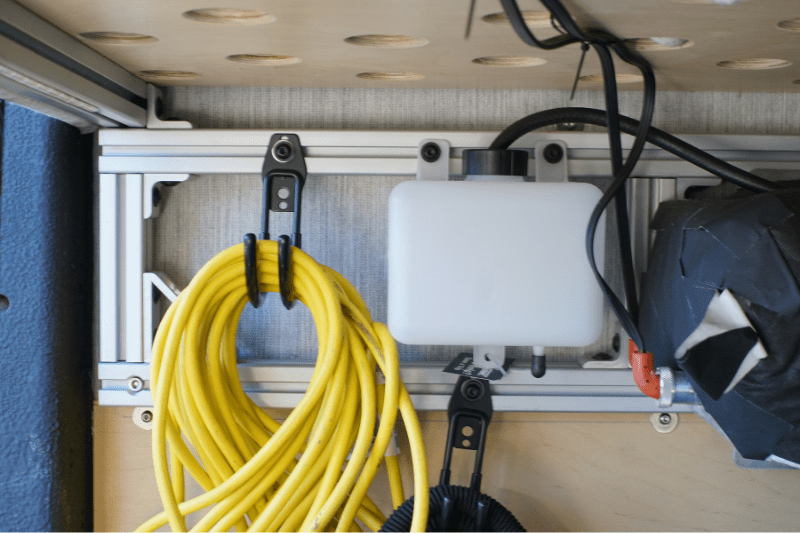
Bonus!
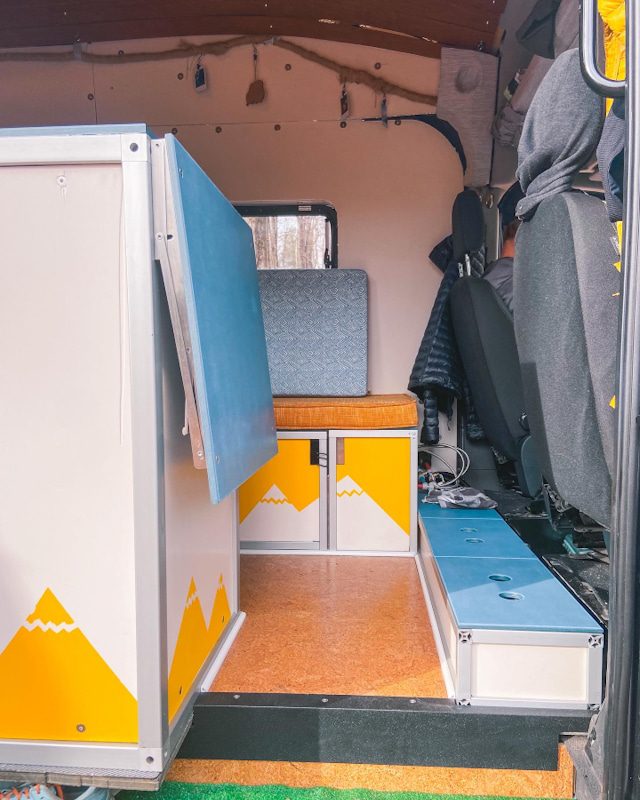
On of the reasons we love doing our bed systems with extruded aluminum like this, is because it doubles as incredibly strong mounting points. Below, you can see how we mount our entire electrical system to our 80/20 bed system. On the other side of our rig, we mounted our water system.
That's it for your 80/20 Campervan Bed System!
That’s it! Like we mentioned at the top, a campervan bed system is a really simple place to start with extruded aluminum in you van build. If you are interested in doing more, be sure to head over to our Beginners Guide to Extruded Aluminum Van Building.
Related Blog Post
How to DIY Install Campervan Flares
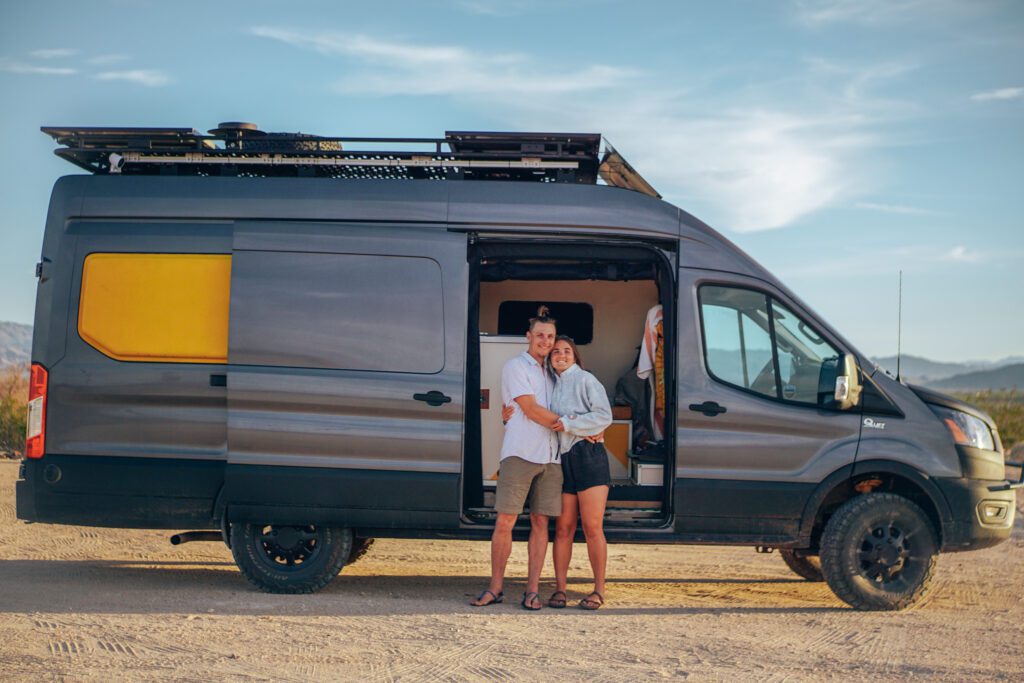
Thanks for being here! Happy building!
Eric + Colby
✉️ Join our mailing list for more content!
🙏🏽 If you are looking for more 1:1 van build help, we are here to help via Consulting or Travel Van Building.
[Start Here] Beginner Guides:


Comments 34
Hello, I’m wondering if you folks have done anything to avoid the transfer of heat through it conducting into the aluminum directly from the frame of the vehicle. I currently have a wooden setup for my bed and have been thinking about upgrading to 8020 but the metal on metal contact from the vehicle walls to the bolt and finally the frame allowing heat to conduct into the vehicle is my main concern. For context I will be using this in the desert and lots of hot locations.
Author
Yes good question – we sprayed the entire inside of our rig with Lizard Skin Ceramic Insulation as a thermal break. Highly recommend! We have some information on it here: https://engineerswhovanlife.com/van-insulation/
Hello! Thanks for all the great information and inspiration!
This is a great design, and good use of the existing Transit wall panel holes. Also love the tip about ventilating the plywood platform- could use the same hole saw used for puck lights in the ceiling.
I have been looking at using IKEA Skorva beams for platform support, and may try that with your side rail design. Strong and quick to remove, but likely heavier and a little taller than 8020 beams.
Question- I don’t see how you got the wall panels behind your 8020 frames. Did you just drill holes in the wall panels, and the 8020 is holding them up? That would also address thermal bridging issues…
(And bonus question- have you ever studied and solved hanging a hammock in a van?)
Thanks!
Author
Ah good question – we drill through the wall panels to use the mounting points for the bed system – you need to drill through it no matter what to mount the panels! If you are having trouble, something we put a bolt into the plusnut in the chassis and bang the plywood against it to get an indent of where to drill 🙂
Re hammock – not personally, but I imagine if you used a strong mounting location, such as one of the beams, and a plusnut with stainless steel bolts, you could hang one easily.
Hi! Just a newbie wondering… You mention” using the Ford Transit’s pre-determined holes for each of our plus nuts” to install your bed supporting frame. But once all the insulation material is up on your walls, how do you know where those pre-determined holes are??? Thanks!
Author
What type of insulation are you using? You should still be able to see, and utilize the holes.
Just starting the build on a 2024 Sprinter and 8020 seems like a great option. I may have missed this, but is there an estimate somewhere on how much weight the bed system can support? Or some process to determine that through the capacity of the aluminum? I know it’s crazy strong, but just wondering the limits of that with a 60″+ span.
Author
That’s a good question, honestly we haven’t done that math. But can at least say.. more than wood can support 😀
Just to be clear, if we want a lower bed we could just bolt one piece of the 80:20 to the wall and attach cross pieces to that, without making a rectangle? The rectangle is purely to adjust for height? I hope I am understanding that correctly. Thanks!
Author
It is for height, and for giving easy mounting points for water, and electrical system components.
We just completed our 80/20 bed built. The system came out great! It is very sturdy. The space below the bed makes a nice sized garage. We originally had two wooden storage boxes on each side of the van. This doubled as a bed platform. The logistics of using such a system was not well thought out, on my part. The new 80/20 platform and garage is very promising. The garage now holds heavy duty locking slides for storage, Dometic fridge/freezer and toilet area. Plenty of additional space for a power station and A/C for the next steps. Can’t wait! Thanks for all the great ideas, tips and tricks. The “Iron TeePee” is ready to roll!
Author
This is awesome to hear!! Happy adventures 🙂
I read that you attached the 15 series rail with plus nuts, then added the 6 inch extension did you also plus nut the top rail of the rectangle ?
I’m converting a passenger transit with the back windows covered, but this presents an issue because you don’t have metal wall to attach the upper rail of the 8020. You can on the ends but middle no support, so extended it would the answer, do you think a 9 or 10 inch extension would be too much with top not attached to the wall? Also I’m making a single bed, do you think using 2 cross 1515, 68 inches I believe, running east west from window to window on top of the rectangle then running 8020 wood mattress supports from front to back, they would be 48 inches would handle the weight? With no additional supports under the bed? Or do all the Bed supports need to run east west so their ends are resting in the triangle? Bed is 68″ x 48″
Thank you for you advice
I just found your website you guys have done a great job very helpful
Author
Hello, thank you so much!
There are two pieces here: mounting and supports. Re mounting: because your bed is narrower than ours by quite a bit, your plan sounds like it will work. 80/20 is wicked strong as is the plusnut mounting method. I think because your bottom rail has the same # mounting points you should be good. If you begin installing and second guessing the strength: Could you slide the bed lower down so that both rails do have mounting points? This does give you a lower bed, therefore shorter garage, though.
Regarding supports: they are not mounted to the walls, just the bars, so you can absolutely run them north/south! You can start by two going east to west and then the n/s ones on top. This could be a way to get the bed a little higher if you choose to mount completely below the window.
Does your bed end right at the start of the back pillars, or is part of it cantilevered out over the space between the pillar area and the door?
Was thinking I might add a vertical support on each pillar and one more full-length span there to extend the bed all the way to the back door.
Cause, you know, dog has to fit in with both of us too! 😛
Author
Dog ABSOLUTELY has to fit in bed! Our bed does not extend back because we have a gear wall that fills that area. However, if you choose 1/2″ plywood at least for the platform, I think it would be strong enough to cantilever.
I’m interested in cabinets for my van I have a box truck 10 foot
Author
Hi Debra! Check out our upper cabinets guide, should be exactly what you are looking for.
Curious why it was necessary to build the rectangle side supports vs just bolting a piece of 15 series 8020 on each side of the van at the height of your upper side rails. Could you explain the need for the rectangle support?
Also, thanks for the 8020 discount. Haven’t calculated what I’ve saved so far but I know we have bought at least $3,000 worth of 8020 from you link!
Author
Hello! Fantastic question! The rectangles provide additional height above the best and most logical place to mount the bed support rails to the frame of the van. At least for Ford Transits. What rig are you working with? Our height was determined by the flares so we had to raise the supports.
Very happy we can help with the discount! Thanks for supporting us 🙂
We are building off a transit trail high top, like yours with flares. About to take delivery this month! So will have a look beyond the current sketchup plans and see how we work this. Would like to avoid using up 1.5 inches on either side with the 8020 rectangle.
Author
Exciting, have a blast! We debated using 10 series (1 inch) for the bed system but really don’t think it would be strong enough. What is your hesitation with 1.5″?
I’m definitely in agreement with you on the use of 15 series for the cross pieces to support the bed. I think 10 series for the side rectangles, bolted well to the van frame would be sufficient support. It’s not a huge depth difference but with some cabinets I have on the garage floor I’m trying to minimize how much that rectangle comes out from the sides of the van.
What’s the height of the bottom of your rectangle from the van floor (actual van floor or from the installed flooring base)? I’m thinking it’s about 20″.
Thought I replied and then it disappeared! Anyway, only hesitation with 15 series was on the rectangles supports, mainly having 1.5″ inches coming into our garage space there vs 1″, not huge but not sure necessary. I’m going with 10 series on those supports and 15 series across for the bed frame supports.
Curious, how far up from the van floor metal are your bottom side rails? Where the transit crossnut holes are which you used.
Author
Ah we have all the comments sent for approval before posting. Sorry about that! Our crossnuts are 22″ up!
How high off the metal floor of the van did using 6″ vertical risers make the bottom of your bed? Curious on the distance from bottom of the cross members to van floor.
Author
Around 30″ is the bottom of our bed (before the mattress).
Whoops, just re-read and spotted your advice to use 40 series!
Author
Awesome! We use 15 series for the bed – so I think 40 series would be comparable for sure. Great decision! Thanks for reading.
Hey Eric and Colby,
Thanks for your excellent website! After reading your articles on using aluminium extrusions I’m now dead set on using it in our new van build. Just the bed/bike garage to start out with and see how we get on.
I’ve just found a supplier here in the UK that seems quite reasonable, they have 20x20mm or 40x40mm. Obviously we want to maximise space in the build, would 20x20mm be strong enough for full, unsupported span of the van (1870mm)?
Cheers, Paul
I wonder if there’s a way to build a removable bed frame? I have a CRV that I’d like to perhaps sleep in during road trips. But I don’t want to add permanent fixtures, just a bed to set up for a quick overnight. I’ve seen instructions for making a temporary plywood bed in an SUV, but the aluminum framing seems sturdy and lightweight. Hmmm. Thank you for the ideas!
Author
Interesting! I can totally see this as a solution. The parts that mount on the wall could stay, but you can easily remove the crossbars and plywood platform in maybe 10 minutes time. We actually remove our plywood platform quite often to do work in the garage. Would this work? Or do you want to be able to remove the wall pieces as well?
Do you do van builds?
Author
We offer van build consulting but do not at this time offer full van builds.