
Camper Van Water System: Everything you need to know
In This Guide:
Understanding Camper Van Water System Components
Camper van water systems are much simpler than other systems such as electrical, or propane. All van water systems have the same basic construction and few decisions need to be made regarding sizing and components. By the end of this guide, you will not only be able to install a robust camper van water system that will survive forest roads and the coldest winters, but you will also understand how your water system works.
In the most basic form, a van water system is comprised the following:
- Fresh water tank for storing water
- 12V water pump for pressurizing your water system
- Accumulator for evening out water pump water delivery
- Points of use for using water
- Grey tank for catching used water
- Tubing (piping) and connectors
- Optional hot water components
Camper Van Water System Basic Diagram
Below is a basic diagram of how a van water system is set up.

** Disclaimer: This blog post contains various affiliate links that provide a small kickback to us, at no additional cost to you. We truly appreciate your support if you choose to purchase through these! **
12V Water Pump
First things first, you need to pressurize your water system so that you can get water from your holding tank to your points of use. Doing this is simple, you utilize a 12v water pump. This water pump should be on a 12v switch so that you can turn it off as you don’t want your water system pressurized all of the time.
Your water pump will draw water from your holding tank via a water pickup tube (more on this later) and push it along your piping to your points of use.
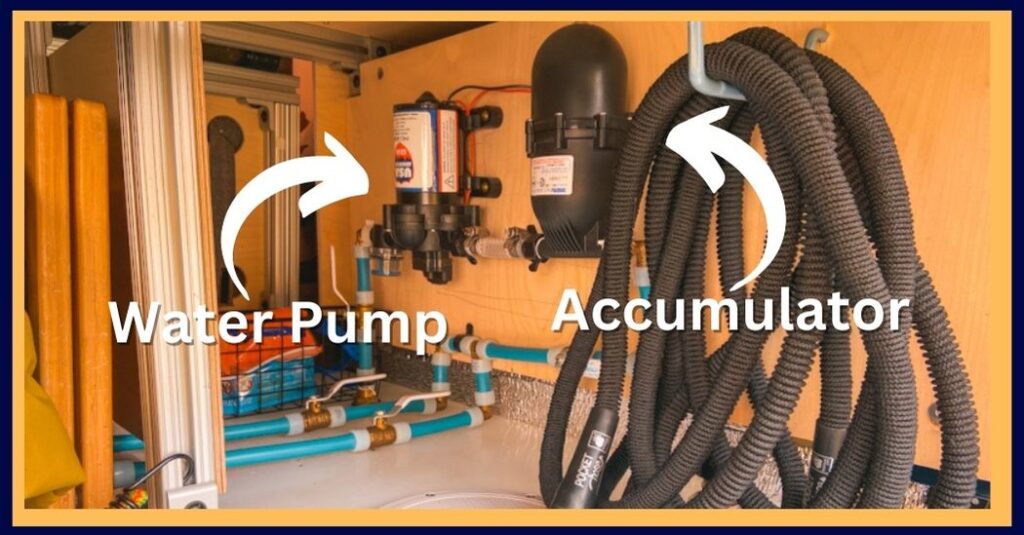
Accumulator
Directly after your water pump you are going to want to install an accumulator to smooth out the pressure changes that water pumps create. What do we mean by pressure changes? We mean that your water pump kicks on at one psi and off at another. This results in your water flow being pretty uneven (think of a sine wave). An accumulator smoothes out water delivery at your points of use creating a better water usage experience.


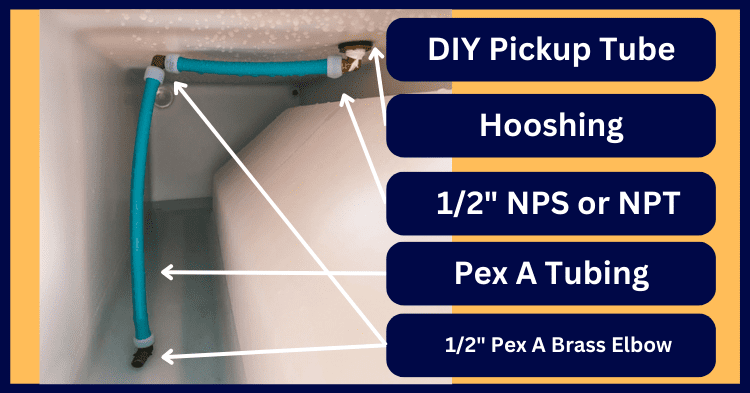
DIY Water Pickup Tube
Most fresh water tanks will come with pre-made holes that you can punch through and insert your tubing. However, we do not recommend using these as they are typically on the sides of water tanks and can therefore become points of failure! In all of our camper van water systems we opt to drill through the top of our water tanks and install a simple DIY water pickup tube to pull water from the bottom of the tank. This not only reduces the risk of leaking but ensures that we get every last drip of water by pulling from the bottom.
Installing a pickup tube is pretty easy. You simply need PEX tubing and 90 degree brass elbows. Then you need to drill a hole in the top of your water tank and install a hooshing for the DIY pickup tube to enter through. You will attach the hooshing to the rest of the pick up tube with a 1/2″ NPS fitting and a bit of teflon tape. See schematics below.
Access Hatch
We also like to install a 6 inch access hatch on top of our water tanks for any potential cleaning, or servicing. This is a simple install that can save you loads of time down the line.
Points of Use
- Showers (see our Complete Guide to Camper Van Showers)
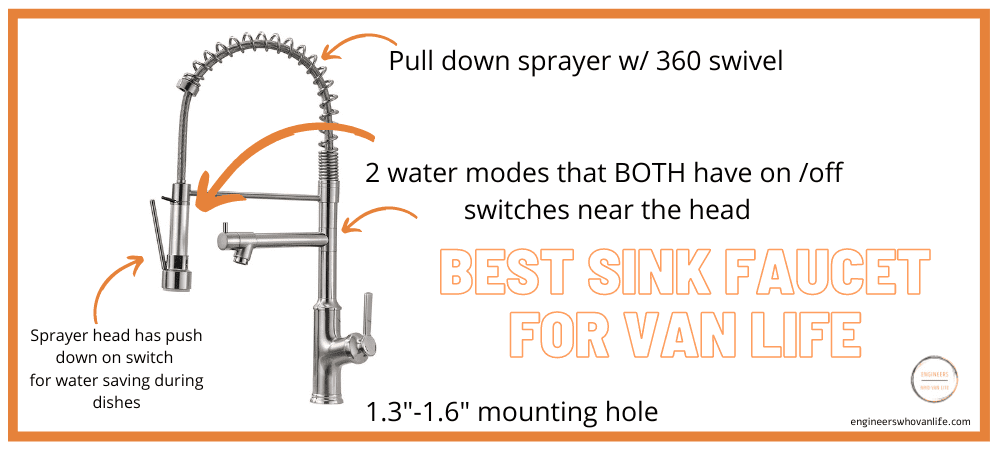
- Sinks (here is Van Life’s Best Faucet, see below for why)
- UV Purifying Faucets (ex. Acuva)
- Bike / outdoor sprayers (example!)
Van Water Tanks | Fresh water, grey water, and black water tanks
Last, but certainly not least, are water tanks. In a camper van, you will at least need a fresh water and grey water tank. Most camper vans do not have black water tanks.
- Fresh water tanks are the biggest water tank you will need in your camper van. They store your fresh, potable water. Read “What size / shape water tank is best for van life“ for how to size this water tank properly.
- Grey water tanks hold water that goes “down the drain” from either your sink, or shower. Because not all fresh water goes down the drain, grey water tanks do not need to be as large as fresh water tanks.
- Black water is human waste water and must be disposed of at proper “RV Dump Sites”. For this reason, most van lifers opt to have a composting toilet instead of a toilet that empties to a black water holding tank.
Plumbing Lines and Fittings for Your Van Water System
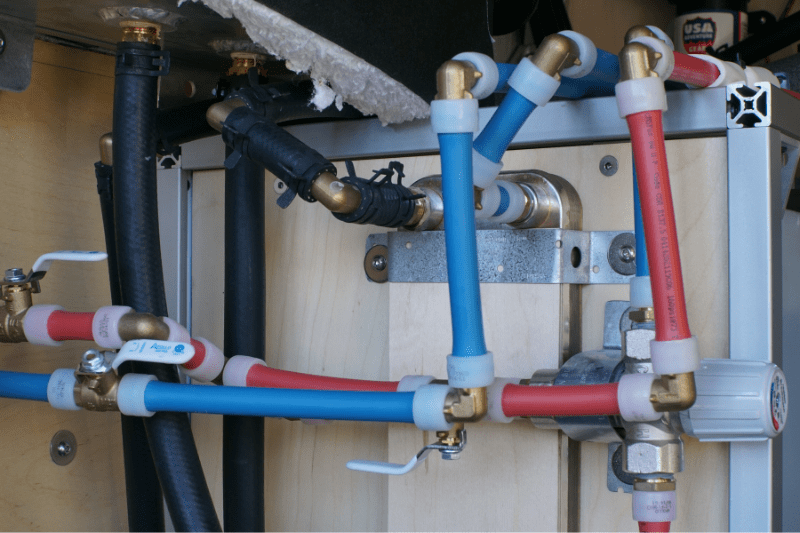
Now, we need a way to connect all of our tanks and components to create your plumbing system. In houses, copper pipe is most often used. However, in a van, this is much too rigid for the tight spaces, so you will need something more flexible. The cheapest option for flexible water piping is braided vinyl tubing. This is easy to work with and very flexible for getting around the funky curves of a van build. Something more durable, and what we personally use, is PEX A or PEX B. Below you can see our van water system plumbed with Pex A expansion fittings.
Pex A vs Pex B Tubing and Fittings Comparison for Van Life
While Pex A and Pex B look similar, there are some key differences outlined below that might make one better than the other for your camper van application.
Pex A

Pex A utilizes Uponor (expanding) fittings that are cheaper than Pex B fittings. Most notably, Pex A material is more expansive and has a higher burst pressure rating (500 PSI) than Pex B, making it more resistant to bursting at cold temperatures. Additionally, the joining method maintains the pipe diameter.
However, Pex A piping and the Uponor install tool is more expensive than Pex B counterparts.
Pex B

Pex B utilizes Push-to-Connect fittings that are more expensive than Pex A fittings. Most notably, the Pex B install tool and piping is cheaper than Pex A counterparts.
However, Pex B is a more rigid material and utilizes non-expanding fittings that are a bit more susceptible to bursting at cold temperatures. Additionally, the joining method, push to connect, causes downsizing of pipe diameter.
Ball Valves
Ball valves can be used as system shutoffs in the case that any part of your van water system needs servicing. At the very least you should have a main system shutoff before the pump. Additional shut off ball valves are nice to have at each individual “exit point”. We personally prefer to overdo it on ball valves on both the hot and cold lines, we place them before and after anywhere a point of failure might arise and need shut off.
What size / shape water tanks are best for van life?
Water tanks comes in all shapes and sizes. The best water tank for van life is an “over the wheel well” water tank as it centers the heavy weight of water over your axle and is efficient space usage. However, they are more expensive than box-shaped water tanks. We have shared various options below!
To determine the proper size water tank for your needs, you should first complete a van life water usage audit.
Van Life Water Usage Audit
Below is a sample van life water usage audit. To customize it for your needs:
- Determine all of the activities you will do daily that require water.
- For all of those activities, determine how much water you will use for that given activity.
- Next, determine how much of that water will go down the drain.
- Sum up all of the needed water and multiply by the number of days you want to go without needing to fill up your water tank. This will be the size fresh water tank you should look for. For full time van lifers, we recommend multiplying your daily estimated water usage by seven, and for weekenders multiplying by no less than three days. Running out of water is never fun and it can take some time between finding water fills.
- Sum up all of the “down the drain” water and multiply it by the number of days you want to go without draining your grey water. This will be the size grey water tank you should look for.
| Activity | Gal / Day | Down the Drain |
| Shower | 1.5 | n/a |
| Drinking | 2 | n/a |
| Dishes (3x a day) | 1.5 | 1.5 |
| Cooking | .5 | 1.5 |
| Hand washing | .25 | .25 |
| Total | 5.75 | 3.25 |
These numbers may seem low, but believe me when I say that you aim to use water sparingly when in a camper van. Even when we do shower at the van we use the mist water setting on our shower head. Additionally, we try to fill up our water bottles from external sources when possible. Lastly, as a van lifer, you will learn quickly to be frugal with water when doing dishes. This is why we love having a faucet with an on/off lever at the head, instead of the base.
How accurate was this audit after 2 years of van life?
Pretty spot on! As 2 people with a 32 gallon fresh water tank, we end up filling our water tank about every 5-7 days. In the winter, when it is harder to fill up water, we can extend it up to 2 weeks by filling up large water bladders at ski resorts, and grocery stores.
Van Water Tank Recommendations
Now that you know how large of water tanks you need, let’s look at some of our recommendations.
Standard Shape Water Tanks
Standard shape water tanks are box shaped. These are often the most cost effective van water tanks; however, they are less efficient with space compared to over the wheel well water tanks.


Over the Wheel Well Water Tanks
Your water tank will be one of the heavier components of your van build. For this reason, it is highly recommended to place it over your wheel well. Additionally, wheel well water tanks like those below are efficient with space leaving more room for storage compared to standard shape tanks.


Grey Water Tanks
All water tanks can be utilized for fresh water, or grey water! However, as discussed above, grey water tanks are generally smaller volume, and may be placed underneath your rig. In addition to the fresh water tanks above, here are some recommended grey water tanks.


Grey Water Management Tips for Van Life
There are two common ways that you can dump your grey water as a van lifer. The first is simply by using jugs that sit under your sink and you pull out when full and dump (responsibly!). The second option, is a permanently mounted grey tank that drains with a ball valve. Our van conversions do the later with an electric ball valve on a switch and we cannot express enough how much ease it adds to our life.
Here are some tips for dumping grey water:
- Try to keep your grey water as “clean” as possible to ease smells and toxicity by trapping food in your sink.
- On a similar note, installing a P Trap is an absolute MUST beneath your sink to capture these odors.
- Never dump grey water near water sources. Ever.
- Sometimes it may be allowed to dump grey water on the ground in areas such as National Forests. Look up local, and state regulations as you travel.
- RV Dump Sites can be found easily and are typically free.
- This is a fantastic and thorough guide to the intricacies of dumping grey water by TheRVGeeks.com
** Please drain responsibly and use biodegradable soaps. Leave No Trace, always!**
Hot Water Solutions: How to get hot water in your camper van!
When your van is your home, you deserve the luxuries as well. Hot water is great for showers, doing dishes, and washing your hands. You have a few options for hot water in your campervan, let’s talk about them!
Budget Friendly: Stovetop!
The most budget friendly option is to simply have a collapsible kettle, or jet boil. These allow you to boil water and do “pour over dishes” with hot water. Yes, this is a thing! It’s not the most glamorous, but it does the trick, especially on a budget, or for the sake of keeping your van water system simple.
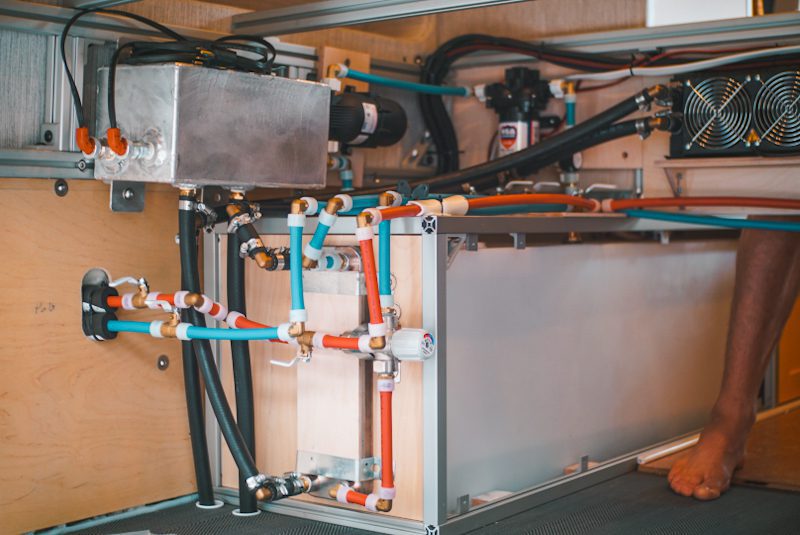
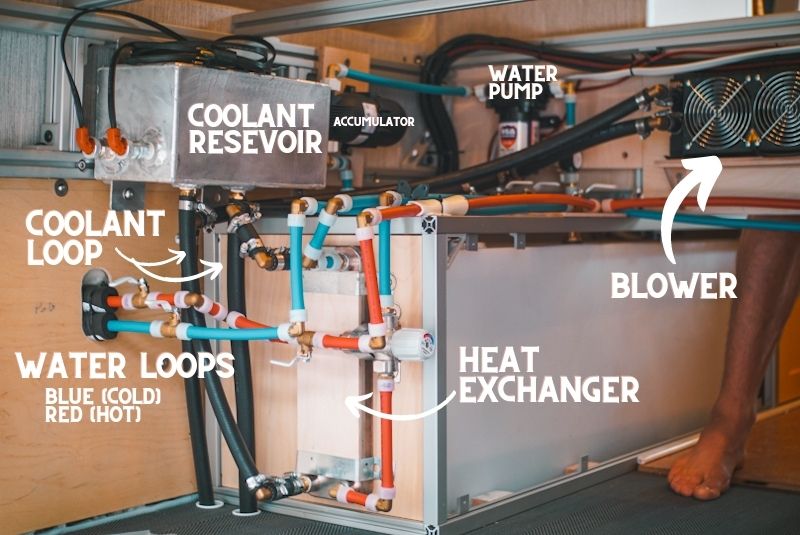
Hydronic Heating System
You can get on demand tankless hot water and hot air (heater) all in one go if you install a hydronic heating system. These systems work by circulating hot coolant over various heat exchangers to output hot air, and hot water. Hydronic heating systems are expensive, and complex to install; however, our worth every bit if you travel to cold temperatures.
Below is our hydronic heating system. To learn more, visit our Camper Van Heaters Guide.
Propane Tankless Water Heater
A cheaper, easier to install option, is a propane powered tankless hot water heater. If you chose this option, it needs to be well ventilated. Most van lifers put this unit on their back doors to use for showers so ventilation is quite easy.
AC Powered Hot Water Heater

DIY Van Water System Best Practices
Before we move on to some supplemental information about camper van water systems, we want to share some tips we have learned over the years:
- Placing your water pump on a switch is absolutely crucial to a long lasting van water system. It is not good to be bouncing down Forest Roads with a fully pressurized water system.
- During your planning phase, try and place all of your water points of use on one side of your layout. It is quite difficult to hide plumbing lines that cross your van. However, if you have a fixed bed, you can route them underneath that. You will just lose some storage space.
- Placing your water tank over an axle is best practice. Water is heavier than you can imagine!
Camper Van Water Filtration
Filtering the water in your system is crucial because of the sheer variety of places that you will fill up your tank. You can never be too safe! The best way to ensure water quality is to place an in-line water filter that filters down to at least .2 microns. Often we see people simply screwing a 20 micron filter onto the end of their input hose, and while this helps with taste, it is not enough for bacteria and viruses. Additionally, you can place a UV Water Purifier at your point of use for extra confidence. We always have both.
Read in depth about Camper Van Water Filtration here.

Fill Ports for Your Camper Van Water System
There are two main ways to fill up your water tank.
- Via an access hatch. This is the simplest option as you simply unscrew the access hatch and drop a hose in.
- Via a fill port with quick connects. This is a more advanced option where you add another hole to the top of your water tank and create a fill port that you can attach a hose to via quick connects. This is quicker, and produces less drip. If you choose this option it is important that you install an “overflow” valve so that you know when your water tank is full!
Van Life Question: How to find water as a van lifer
Refilling your water tank can be one of the tougher chores as a van lifer because safe water spigots are often in cities and can shut off in the winter. IOverlander is by far the best app for finding water sources. You can also simply keep your eyes peeled at parks, car washes, and gas stations for water spigots. Because of the variety of water sources you will fill up from, it is important to have an effective water filtration system on board.
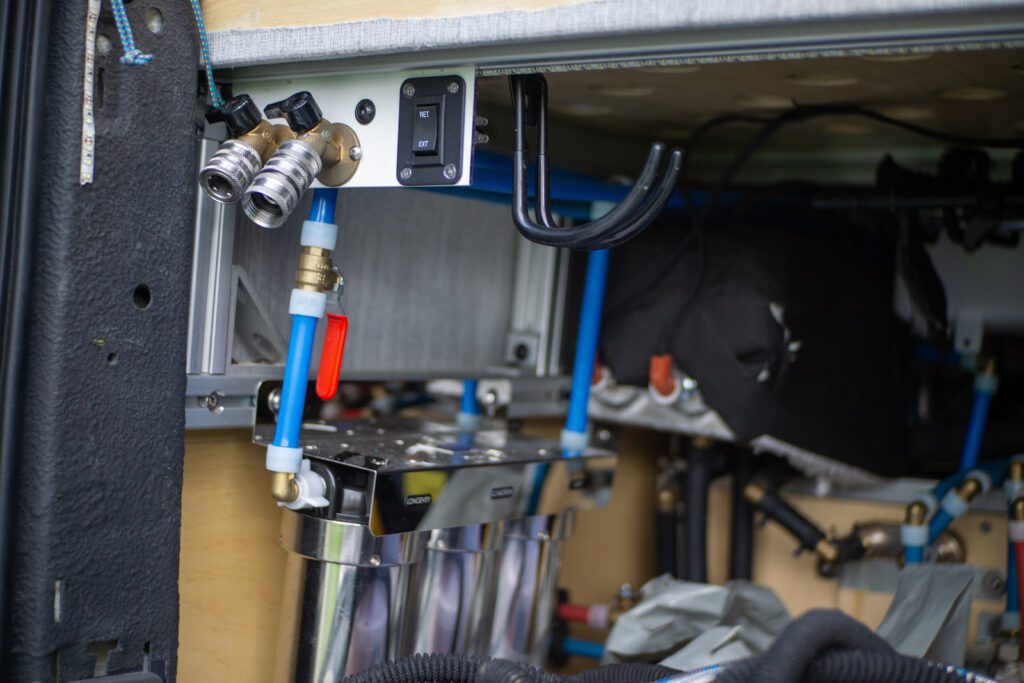
We installed a system that allows us to fill up from pressurized AND non-pressurized systems (streams, lakes, etc). This is a more complex install but has made water fill ups a breeze.
Van Life Question: How to winterize your van water system
If you are going to remain in your camper van during the winter with a heater, you most likely do not have to winterize your system as the interior of your rig should remain above freezing. However, if you have an external grey water tank, you will want to bypass it for the winter with a ball valve.
If you would like to winterize your water system, here are the steps to follow:
- Drain all water tanks AND water heaters.
- Remove all water filters for the winter so they don’t freeze.
- Open all points of use and blow out your lines with an air compressor.
- Optionally for extremely cold climates, add non-toxic anti-freeze to your water tank and run it through your water lines with your water pump.
Thanks for being here! Happy building!
Eric + Colby
✉️ Join our mailing list for more content!
🙏🏽 If you are looking for more 1:1 van build help, we are here to help via Consulting or Travel Van Building.
[Start Here] Beginner Guides:


Comments 3
Pingback: Best Toilets for Van Life in 2022 • Engineers who Van Life
What vent did you use for this? I think I see it on the top closest to the back doors. Thanks!
It is a one way vacuum release valve! lets air in but not out to prevent the tank from collapsing when water is drawn out of it