
Van Electrical Systems Demystified: A Practical Guide for DIY Builders
DIY-ing a conversion van electrical system is one of the most daunting parts of your camper van build. But, it is also one of the most essential. Because, without power, well, you can’t do much, van lifer, or not! So, after DIY-ing two of our own camper vans, and helping countless others via 1:1 Consulting, we are here today to help you understand and master your camper van electrical system.
We will first talk about all of the components you will need and their proper sizes, how to connect them by selecting the proper wire gauges, and then finally how to protect the components with fuses, conduit, and more. Let’s get to it.
In This Guide:
Are you just starting out with your van electrical system? If so, we recommend you start with our:
Beginners Guide to Van Electrical
** Disclaimer: This blog post contains various affiliate links that provide a small kickback to us, at no additional cost to you. We truly appreciate your support if you choose to purchase through these! **
Understanding the Basic Flow of Camper Van Electrical Systems
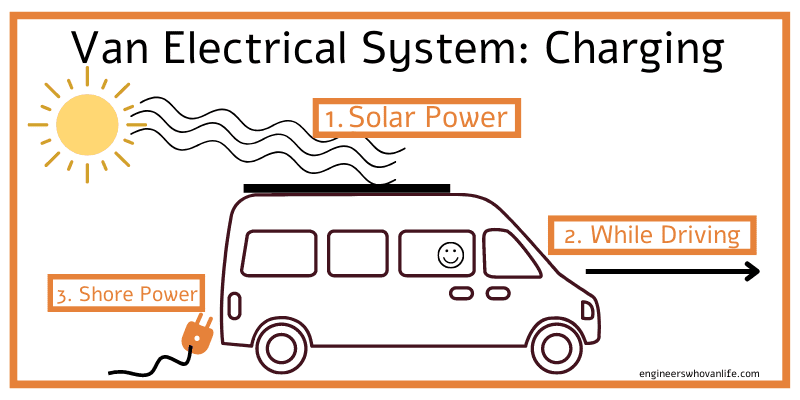
The basis of every camper van electrical system is going to be very similar; batteries, how you charge them, and how you discharge them. It is really important to grasp these basics before you dig into the nitty gritty of wire gauge, amps, volts, watts, etc. Don’t worry, we’ll get there eventually! The basic flow is shown below and we will delve into it in depth throughout the next sections.
Camper van batteries can be charged 3 different ways:
- Solar Power
- DC-DC Charging while you drive
- Shore Power
Camper van batteries can then be discharged in 2 ways:
- DC power usage
- AC power usage (outlets)

How do you charge your batteries in a camper van?
In the diagram above, you can see the three main ways to charge your camper van house batteries. We always recommend having at least 2 of these options as a van lifer for redundancy and rainy days (literally):
- Using solar power! You can install a Solar Charge Controller to convert free energy from the sun into usable energy in your camper van. This is a fantastic way to charge; however, it can rarely be relied on fully do to solar angles changing as you drive around the country, seasons changing, and cloudy days.
- Using a DC-DC Charger! You can install a DC-DC charger between your chassis battery and your house battery. This component then pushes charge via your alternator to your house batteries as you drive while keeping everything safe and cool.
- Using shore power! You can install an Inverter Charger and then plug your camper van into shore power to charge from a plug.
How do you deplete your batteries in a camper van?
You deplete you camper van batteries by using power in your daily life. This includes anything from charging your phone to cooking dinner. There are two types of loads: DC (direct current) and AC (alternating current).
AC vs DC Loads
With DC power, the current stays constant in one direction and the voltage remains consistent. What really matters here though is that DC power is anything that is hardwired into your system. Most camper van electrical systems are 12V, or 24V. DC power is the most efficient power as it does not need to be converted prior to use, therefore, you should utilize this wherever possible! Examples of DC loads include:
With AC power, the current changes direction occasionally and the voltage follows a sine wave like pattern. These characteristics make it ideal for larger load applications. The best way to think of AC power, is an outlet. Anything that plugs in to an outlet is pulling AC power! Therefore, in your camper van, some examples of AC loads are:
Our FREE Camper Van Electrical Diagram
Now that you understand the basic flow of a camper van electrical system, here is an example of one in practice! We drew up a diagram of our second conversion van’s electrical system for free download below.

Components of Your Van's Electrical System
We know how batteries are charged, and how they are discharged. Let’s now discuss the components you need to actually DIY your van electrical system. For each component we will discuss what it is used for and how it works:

1. Batteries
At the hub of your system are your batteries. These will hold a charge storage so that you can run your DC and AC loads. There are two main types of batteries to choose from and a massive array of size options. The following sections will walk you through choosing the right batteries for your particular camper van electrical system needs.
Which batteries are best for a DIY camper van electrical system?
There are two main types of batteries in camper van systems: Lithium Iron and AGM. The decision is often brought down to a combination of budget, weight, and battery life. AGM batteries are cheaper, heavier, and can only be discharged to half capacity before sustaining damage. Lithium Iron batteries are more expensive, lighter, and can be discharged nearly fully.
Let’s work through an example. Say you need 200ah of battery capacity (audit coming later…), you would only need 200ah of Lithium batteries; however, if you choose AGM, you need 400ah of batteries to achieve the 200ah of usable capacity.
AGM Battery Recommendations
Below are a few AGM batteries we recommend priced lowest to highest:

LiFePO4 Battery Recommendations
There are near endless LiFePO4 battery merchants out there now a days. Below are a few we recommend priced highest to lowest:

How much battery capacity do I need for van life?
Now that you know what type of batteries you want, let’s determine how much battery capacity you need for your van life. Your first job here is to figure out how much power you will consume in a day living in your van. We built a calculator to walk you completely through those steps. Once you complete the calculator, you will know your daily power consumption. From there, we recommend having a minimum of two days worth of battery capacity on board your camper van. You do not need to buy one massive battery, you can buy multiple of the same batteries, wire them in parallel, and add the capacities together. We personally have 2x 270Ah LiFePO4 batteries.
“Calculating your electrical system needs is important when choosing your battery bank. Most van lifers opt for systems with 400 to 600 amp-hours (AH), which is plenty sufficient for basic lighting, ventilation, and device charging. However, if you plan on running high-energy appliances like air conditioners, you’ll want to consider a system with over 600AH to account for that extra draw.” – Taran Causey, Darien Overland
Our Sample DC Power Audit
Below is a sample result from our DC power usage audit.
| Point of Use | Current | Time per day | Daily Usage |
| Overhead Dimmer Lights | 1.5A | 8hr/day | 12Ah |
| Gooseneck Reading Lights | 1A | 2hr/day | 2Ah |
| Maxx Air Roof Fan | Varies but .3A average | 20hr/day | 6Ah |
| Dometic CRX 110 Fridge | 6.2A | ~30% 24hr = 8h | 49.6Ah |
| Standard Gasoline Heater | 1.7A (average) | 8 hr / day | 13.6Ah |
| USB Charging | 1A (generous) | 2hr/day | 2Ah |
| US Adventure Gear Water Pump | 6A | .5 hour per day | 3Ah |
| Internet Router | 1.5A (max) | 24 hr/day | 36Ah |
| Total | 124.2Ah |
Related Reading: Campervan Lighting Options Compared
Our Sample AC Power Audit
Your AC power audit calculations require one more step as about 15% of usable power is lost in the conversion from DC -> AC power. Therefore, you will need to divide each calculation by 0.85. This is factored into the calculator, but if you aren’t using it, here is your warning! Below is our sample AC power usage audit:
| AC Appliance | Current (A) | Time per day | Daily Usage |
| Charging Laptops | 45W / 12V /.85 = 4.4 A | 2hr/day | 8.8Ah * 2ppl = 17.6Ah |
| Induction Stovetop | 1000W /12V /.85 = 98 | 45 min/day | 73.5Ah |
| Tea Kettle | 700W / 12V /.85 = | 5 min / day | 5.7Ah |
| Blender | 900W / 12V/.85 = 88A | 6 min /day | ~8Ah |
| Charging Misc (vacuum, drone, etc) | 50W / 12V /.85 = ~4A | 2hr / day | 9.8Ah |
| Hot Water Heater | 750W / 12V / .85 = 74A | 1hr / day | 73.5Ah |
| Total | 188.1Ah |
Our total estimated power consumption from this audit is 238.8Ah. So, we comfortably went with 400ah in our first build and upgraded to 540ah in our second van build as the more capacity = more days self sustainable.
In practice our average daily discharge is 180Ah.
2. Inverters and Inverter Chargers
Inverters convert the 12/24V power in your batteries to usable 120V power. Another way to think about this simply is that inverters are what deliver power to your outlets that your AC appliances need. During this conversion, about 15% of usable power is lost, making it a bit less efficient than direct DC power.
Inverter vs. Inverter Charger
Standard inverters allow you to convert 12V/24V to 120V. However, inverter charges add another capability to your electrical system with the ability to charge your house batteries with shore power! The only way to use shore power in your camper van is to have an inverter charger.
What size inverter do I need for van life?
Now that you know if you want an inverter, or an inverter charger for your camper van, let’s figure out how to size it properly. To size your inverter, you will need to determine the maximum current you will be drawing from your camper van electrical system at any one time. Luckily, you already did this above in the AC power audit. Determine which AC loads you will be running at the same time, any given time. Then, get an inverter that is rated slightly higher than that sum.
Inverter Recommendations
Inverters
Below are a few Inverters we recommend priced lowest to highest:
Inverter Chargers
Below are a few Inverter Chargers we recommend priced lowest to highest:
Most Victron electrical system components are alternatively available on BattleBornBatteries.com, too.
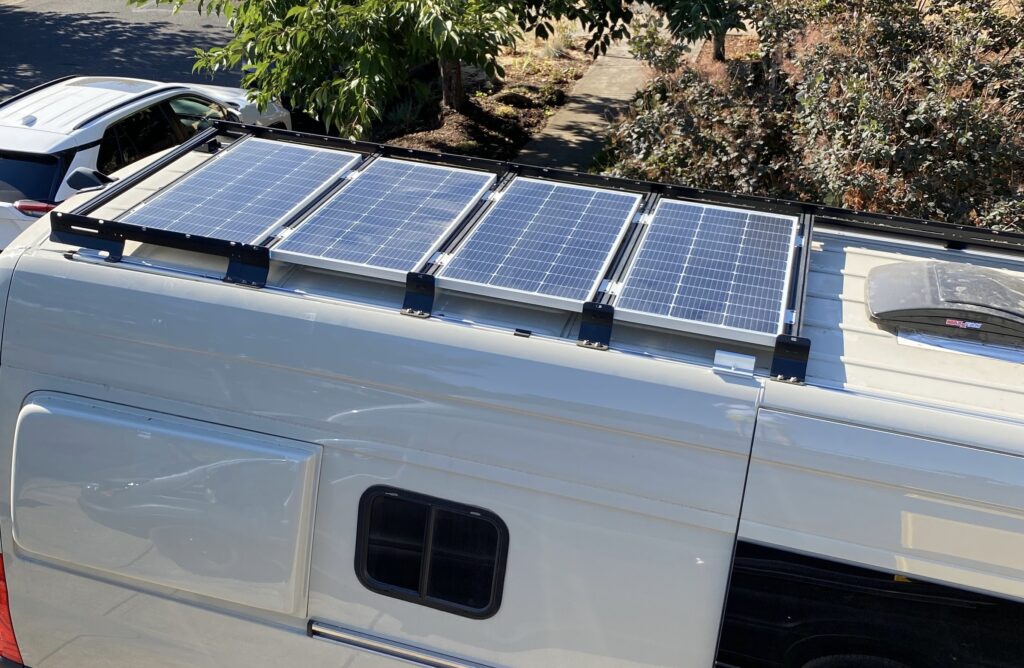
3. Solar Panels
A full power audit will guide you to how much solar power you will need to provide ample electricity for you van batteries. But! We can tell you that maximizing physical solar panel SIZE saves a ton of work during your install!
For solar systems greater than 300 W, drop those 100 W panels and instead opt for 175 W, 200 W, or even larger residential solar panels. On our campervan, Rover, we have 2x 370 W residential solar panels. Using larger solar panels simplifies the wiring and mounting of your panels and likely allows you to fit even more solar on your van roof! Additionally, if you can source “residential panels” they are a tad more efficient. However, sourcing a small quantity of large panels may be difficult, so just do what you can.
The tradeoff with maximizing solar is you lose deck space! So plan your roof layout wisely. If you are interested in all things solar power specifically, head on over to our dedicated Solar Power for Camper Vans guide.
4. MPPT Solar Charge Controller
A MPPT Solar Charge Controller (Maximum Power Point Tracking Solar Charge Controller) is the component of your electrical system that converts the voltage of the solar energy you harvest and delivers it to your batteries at the optimal voltage that is safe for them to charge at. A solar charge controller is needed if you want to use solar panels.
MPPT Charge Controllers are more efficient than other charge controllers on the market because they can deliver a higher percentage of power to the batteries. They do this by simultaneously increasing amperage while decreasing voltage of the current.
Your solar charge controller should also have a thermal circuit breaker so that you can shut off solar panel charging if needed.
How To Size Your MPPT Solar Charge Controllers
Solar Charge Controllers will have numbers after them, for example “100/30”. These numbers represent the maximum voltage and maximum current they are rated for. For example, a Victron MPPT Solar Controller (100/30) will have a maximum voltage of 100V or 30A of current. The number you are aiming for is unique to your specific solar setup. To determine what is safe for your system you need to know how many solar panels you will have and how you are going to wire them.
If your panels are wired in parallel, take the amperage of each solar panel and add them.
If your panels are wired in series, take the voltage of each panel and add them.
The resulting number should not exceed the rated voltage and max rated amperage of the charge controller.
Here’s a working example. We have 400W of solar panels wired in parallel. Each panel (100W) is about ~5A. This results in ~20 total amperage. We chose a 100/30 Charge controller since neither our voltage nor current will exceed 100V or 30A.

5. DC-DC Charger
The purpose of a DC/DC charger is to charge your batteries while you drive. This is done by a DC/DC charger sitting between your house and chassis batteries. The DC/DC charger is safer than a standard battery isolation manager (Li-BIM) as it is able to control the current and voltage going in to your precious house batteries. However, they each do the trick and we have used them both.
Charging via DC-DC chargers are a great addition to any van electrical system, especially to help you get through the winter!

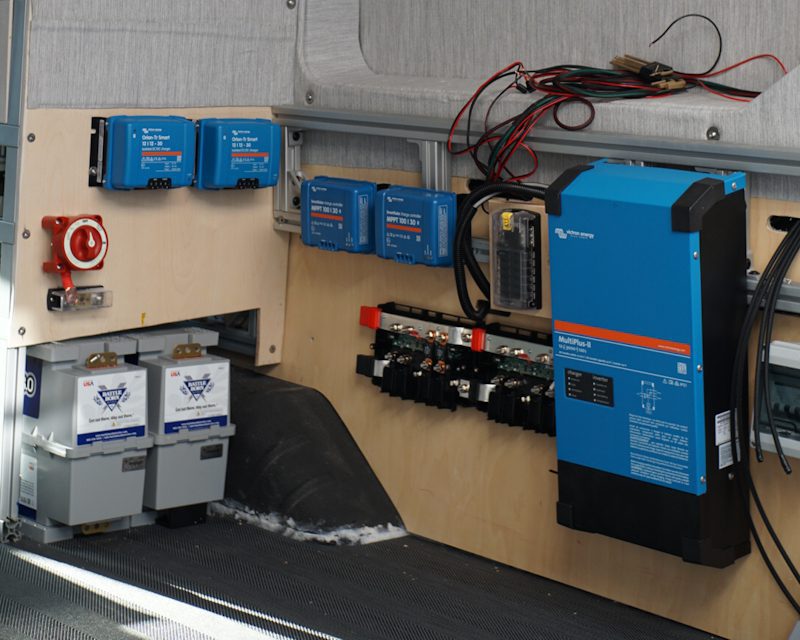
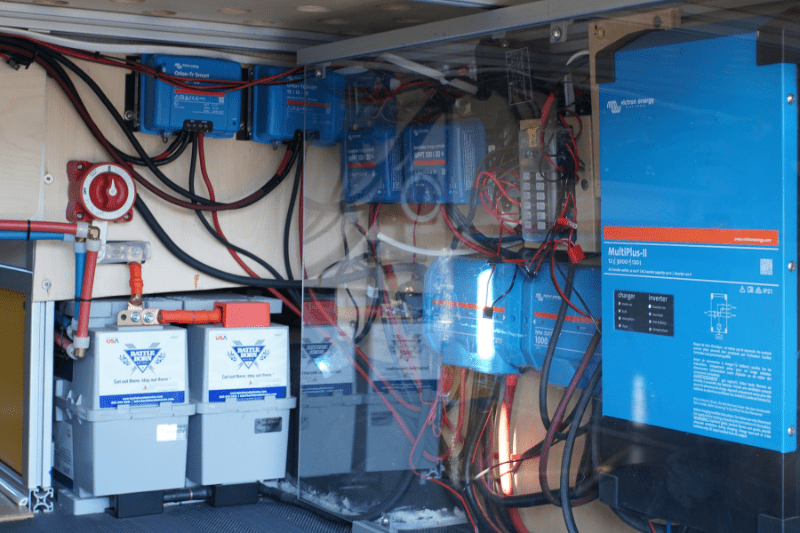
6. Bus Bars or Lynx Distributors
Typically in a van electrical system there will be quite a few cables coming off your battery terminals, and they stack up quick. For this reason, you will need a bus bar to extend the positive and negative terminals in a clean manner. Additionally, you could choose to install a Lynx Distributor that is essentially a positive and negative bus bar in one. Lynx Distributors are a modular bus bar that has space for equipment circuits and fuses.
Bus bars, and Lynx Distributors, prevent us from unruly stacking on the battery lugs. This creates a cleaner system, and allows us to monitor the paths separately.
7. Ve.Bus Dongle
We do not recommend running your inverter all of the time since it really is not an efficient use of energy. This presents a difficulty as most van builds have the inverter in the “garage” area so turning it on and off is a challenge. However, a ve.bus dongle is a Victron component that enables Bluetooth for your inverter. It connects to your inverter with a simple ethernet cable (or Victron has one for ease) and allows you to toggle the on/off switch and change Inverter settings from the Victron Connect app.
** This only works with Victron Inverters.
8. Battery Monitor or Smart Shunt
Monitoring your batteries is crucial, especially for the first few weeks of van life as you figure out how much power you actually use. A shunt measures the voltage and current, in and out of your battery. This allows it to accurately measure battery status. A smart shunt uses bluetooth to use your phone to display status. Alternatively, you can use a battery monitor such as the BMV 712 with a physical display.
To sum it up, all battery monitors require a shunt in front of the batteries to measure status, but from there you can choose what your display device is: a physical display, or straight to your phone. We prefer the SmartShunt connection to our phones as we can access status from anywhere near the van.
** Your shunt must be sized to accommodate the total amps of your system.


9. DC Fuse Panel
A DC Fuse Panel serves as the distribution point for all of your DC appliances (determined in your Audit!). Think: roof fans, lights, fridge, heater, USB plugs, etc. All of these “points of use” are hardwired into your DC Fuse Panel with a properly sized fused. We discuss fuses in the “Protect Your Camper Van Electrical System section”

10. AC Distribution Panel
AC Distribution Panel

11. Master On / Off Switch
All of your DC “points of use” are on fuses, and your AC appliances are on breakers. This allows power to be turned off to all of them individually. However, power can still flow through your system. To enable safe servicing of your camper van electrical system you will need to have a master on /off switch.
Additional Camper Van Electrical System Considerations
In addition to choosing the right components, you will want to choose the right system voltage, select the right size wires, and protect your electrical system thoroughly. Next, we discuss each of these points.

Should my van electrical system be 12 or 24V?
We briefly mentioned above that most van electrical systems are 12V. However, there is also a place for 24V systems in some situations. Voltage is defined as the potential difference, or in practical terms the “speed” that electrons will travel through an electrical circuit. Most generally, the larger the battery capacity system, the higher the battery voltage is appropriate.
We recommend 12V batteries for under 7kWh (~580 amps). 12V batteries are generally easier to source and have more manufacturer options. In addition, they do not need modifications for DC appliances as most usually run 12V.
We recommend 24V batteries for larger systems over 7kWh. These batteries will be more expensive and more complicated to wire. However, they are more compact and energy dense! You will need a 24V-12V converter for all 12V devices.
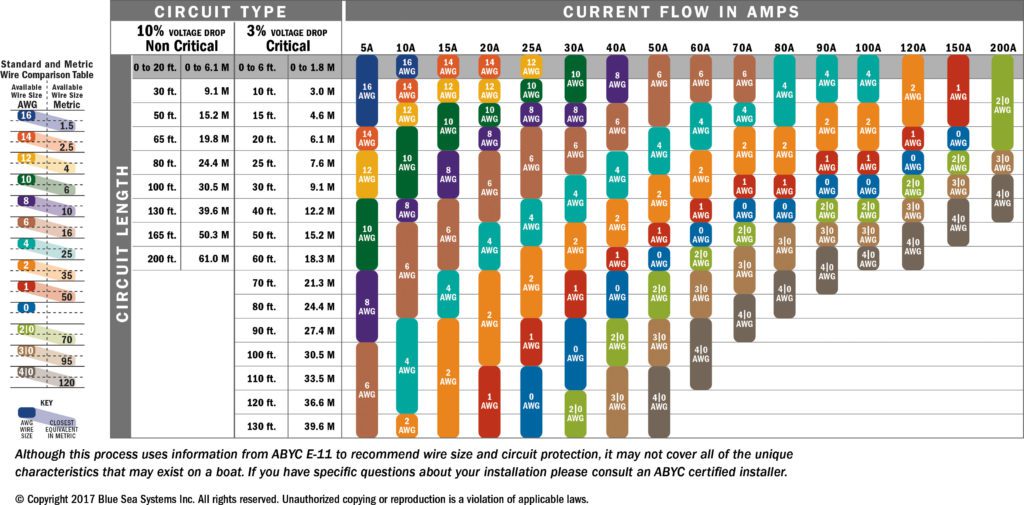
Selecting the Correct Wire Gauge
There are only two pieces of information you need to select proper wire gauge: the current of the load, and the distance that load has to travel from power source to appliance (ie wire length). You can always use a larger gauge wire, but the reverse is not true and can result in catastrophic failure of your system. The downside to larger gauge wire is that it is harder to work with and more expensive.
In residential wiring, solid copper wire is the “norm” but when building a van stranded copper wire is needed as it is much more resistant to the daily vibrations your van is subjected to. Can you use solid copper wire? Sure. Do we recommend it? No.
Step 1: Determine current flow in amps
Determining current load of an appliance is as easy as checking the manual or spec sheet. You are simply looking for the amperage of the appliance. Many appliances, such as a blender, might even have the amperage on the label. Many appliances are rated in terms of power (wattage, W) rather than current (amperage, A) – do not despair though, they are easily convertible! To get current, simply take wattage and divide by voltage.
Here is your equation:
Current (I) = Power (W) / Voltage (V)
For DC appliances, the voltage to use is the voltage of your batteries, generally 12V (maybe 24 for larger systems). For AC appliances, the voltage to use is 110V.
Step 2: Determine circuit length
This is as simple and straightforward as it sounds. Measure the path the wire will take from batteries to where the appliance is going and then back to the batteries. When approximating this number, always best to approximate too high than too low. And don’t forget to get the distance going both directions.
Step 3: Determine if an appliance is a 'critical voltage drop' appliance
As power travels from the power source to the load, it encounters a small amount of resistance in the wire which causes the voltage to drop. Therefore the voltage at your endpoint is never the full voltage leaving your voltage source. Certain appliances can tolerate more or less voltage drop than others: we call these critical drop and non critical drop appliances. Critical drop appliances can only tolerate a 3% voltage drop and non critical voltage drop can handle up to a 10% voltage drop.
Critical voltage drop wires include those connecting the batteries, the inverter, MPPT charge controllers, and your DC fuse panel – basically the bones of your electrical system. Non critical voltage drop wires are those going to your individual point-of-use appliances that are generally more tolerant to fluctuations in voltage (disclaimer: please check with your appliance manufacturer to be sure).
Step 4: Use the below chart
Once you have the above information for each load, use the below chart to determine what gauge wire you need. You can begin to increase sizes of wires such that you don’t have to buy different wire for all appliances. Again, be sure to not undersize wires! For example, in our van build we narrowed down to 12 and 16 gauge wire for our DC appliances.
Protecting Your Camper Van Electrical System
It goes without saying that all electrical systems need protected, not just campervan electrical systems. One of the dangers of a van’s electrical system is rubbing through the insulation on a wire, and then creating contact between said copper wire and van. This would ground the system to your chassis unexpectedly, and can even result in vehicle fires.
In camper vans, especially, you have to route your wires through small spaces, they come into contact with sharp edges, and on top of that, your vehicle is constantly moving and shaking. For all of these reasons, we tend to overprotect our system with all three of the following:
- Fuses
- Sheath
- Conduit
All systems should include fuses. From there, wire sheath and conduit and recommended but not required.
Fuses
A fuse is a thin strip of metal that melts when there is an overcurrent. This melting opens the circuit thus cutting power supply to the device on the other end. Fuses are an essential part of any campervan electrical system and probably the most known way to protect an electrical system.
To choose the proper fuse, start by checking the device on the circuit. That is the best recommendation to follow! If that is not present, use the following:
- Maximum Fuse Size: Use the chart below
- Minimum Fuse Size = Appliance Amperage x 1.25
We personally recommend blade style fuses with the Blue Seas System DC Fuse Block. It’s simple, and CLEAN.

Wire Sheath
Wire sheath is an expandable braided sleeve that adds a layer of resistance to rubbing and cutting, or “abrasion resistant”. We cover our wires with wire sheath when they pass through the wall cavities. We noticed a lot of sharp edges in the cavities, so this gave us more confidence in our system. We used:
- Alex Tech Wire Sheath (varying sizes)
Wire Conduit
Wire conduit is a plastic-y covering that you slide over the wires. We added this as a final layer of protection if the wire sheath was rubbed through.
- 5/8in Wire Conduit (fits multiple small wires that run together)
- 3/8 inch Wire Conduit (fits one larger wire)
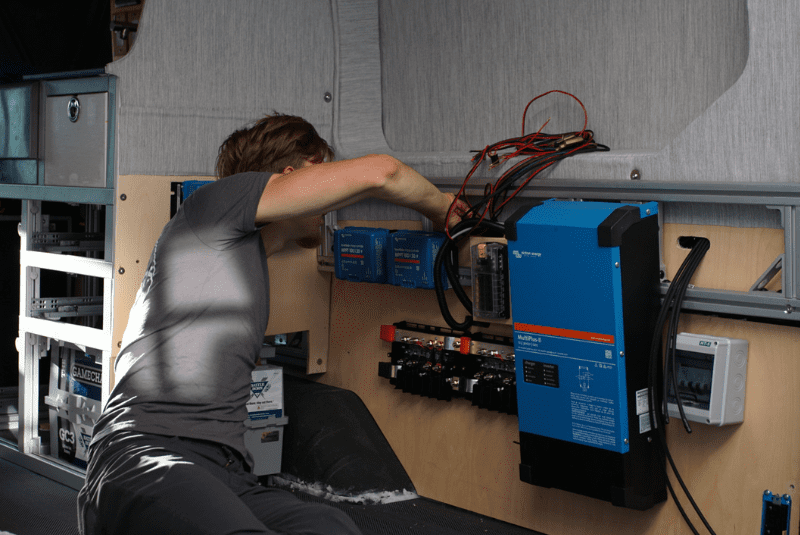
Step-by-Step How to Install Your Camper Van's Electrical System
By now you have a more complete understanding of all of the components that are in your camper van electrical system! The process we generally follow when installing electrical systems in camper vans is the following:
- Arrange and mount all electrical components in a tidy and logical position. Be sure to account for the ability to run wires to them.
- Wire your batteries together. We have a cost effective DIY Battery Cables guide for this.
- Deliver power to your bus bars, switch, shunt, on/off switch and main battery fuse.
- Then, wire all of your bus bar connections first. This includes your MPPT Solar Controller, DC to DC Charger, and Inverter / Charger.
- Finally, wire up your point of use. This includes all DC appliances and AC outlets. Be sure to protect any wires running near sharp edges with conduit or sheath

How much does it cost to install an electrical system in a camper van?
Your camper van’s electrical system will be one of the more expensive systems in your van conversion. You will be spending a couple thousand dollars. A few ways to save money:
- Shop on holidays. Often manufactures have steep discounts on holidays such as Black Friday and Cyber Monday.
- Look into your states solar rebates! Some states offer rebates on solar systems installed on primary residences!
- Invest in quality, long lasting components. This one sounds a little counter intuitive; however, if you invest in quality components like Victron, your electrical system will last a lot longer than some more budget counterparts which means you’ll save money in the long run.
- Bookmark our list! We have a Complete List of All Van Build Components, and we maintain an up to date “Deals” page with all current deals!
DIY Van Electrical System Summary
We hope this guide helped you gain the confidence you need to tackle the electrical system in your DIY conversion van. We are always open for questions! If you would like some further 1:1 assistance, please schedule some time on our 1:1 Van Building Consultations calendar! Happy building.
Thanks for being here! Happy building!
Eric + Colby
✉️ Join our mailing list for more content!
🙏🏽 If you are looking for more 1:1 van build help, we are here to help via Consulting or Travel Van Building.
[Start Here] Beginner Guides:


Comments 2
This is just what I’m looking for
I’m turning utility trailer into a