
DIY Van Build Guide: Camper Van Cabinets with 80/20 (Extruded Aluminum)
Upper cabinets are the perfect place to start if building your DIY conversion van with 80/20 (extruded aluminum) interests you. This is one of the more simpler modules in a camper van, and it only requires a few basic parts.,
To construct 80/20 camper van cabinets, you will need:
- 80/20 10 series profile (varying lengths)
- Accompanying hardware for each corner
- Hardware to attach the van cabinet to the ceiling and wall
- Cabinet faces and sides (your choice!)
If you would like to learn the basics of working with extruded aluminum in your DIY van build, we recommend you to start at our Beginners Guide to 80/20 Van Builds. If you are ready to build some van cabinets, let’s get to it!
In This Guide:
Why build your camper van cabinets with extruded aluminum?
As mentioned above, upper cabinets are one of the more simpler modules to build with extruded aluminum in your camper van. However, there are a few additional reasons we would recommend using extruded aluminum over wood for upper cabinets.
- The construction of 80/20 upper cabinets is much more space efficient compared to wood construction. Because extruded aluminum is incredibly strong for taking up such little volume, you will have more room in your cabinets for storage than you would if you used a larger amount of wood that equaled the same strength.
- The end result is lightweight. Saving weight is generally of utmost importance during a van build. If you are using 2x4s for construction of something as simple as cabinets, the weight is going to add up quick! Constructing these basic upper cabinets out of 80/20 will save you weight, and be much stronger as mentioned above.
** Disclaimer: This blog post contains various affiliate links that provide a small kickback to us, at no additional cost to you. We truly appreciate your support if you choose to purchase through these! **
Are you building your camper van with extruded aluminum?
If you are, you are in the right place! We have built 2 of our own camper vans with extruded aluminum, and have helped countless others. Extruded aluminum is a fantastic choice for strong, long lasting, and lightweight conversion vans.
We have written build guides for most other modules in your DIY Van Build, you can find them below.
80/20 DIY Van Build Module Guides:
Below you can find specific step-by-step guides to building modules in your camper van with extruded aluminum. If you are looking for a starter project, the bed system, or upper cabinets are excellent places to begin.
Looking for specific assistance? We offer Virtual Consulting and love talking with our community about building vans with extruded aluminum. One of our more common consults is about reviewing your extruded aluminum designs before purchasing.
8020.net discount
We have partnered with 8020.net to bring a discount to the DIY van building community! By clicking through any link on this page, a 5% discount will be applied to your cart on 8020.net.
How much does this project cost?
We priced out one 53″ long, 14″ high upper cabinet at about $550. This included all bones, but also finishing materials such as hinges, acrylic panels, doors, struts, etc. This price can vary up, or down, depending on your choice of finishing materials. The cost of just the bones: extruded aluminum + hardware, for the same size cabinet would be around $250.
Determining the Lengths of 80/20 Needed
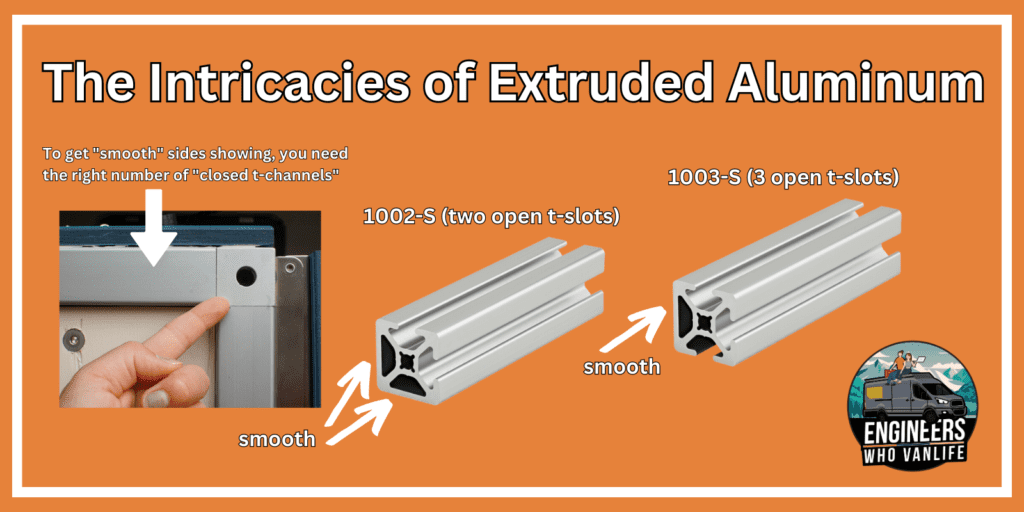
For this DIY camper van build project, you will use 10 series 80/20 profile. This is a 1 inch x 1 inch profile that is more than strong enough for upper cabinets and it comes in varying finishes. The goal of planning ahead with extruded aluminum modules is to have “smooth” finished pointing outward so that you don’t see the t-slot.
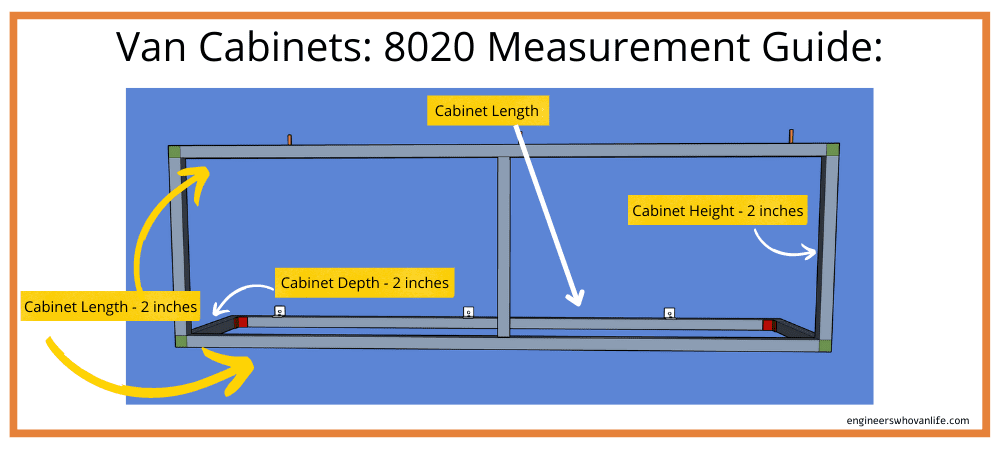
- 3 x “cabinet length”
- 2-3 x “cabinet height” (2 for shorter, 3 for longer cabinets)
- 2 x “cabinet depth”
Shop 8020 Lengths needed:
| 8020 Part # | Length | # Needed | Link |
|---|---|---|---|
| 1003-S | Cabinet Length minus 2 inches | 2 | Add to Cart |
| 1002-S | Cabinet Length | 1 | Add to Cart |
| 1002-S | Cabinet Depth minus 2 inches | 2 | Add to Cart |
| 1002-S | Cabinet Height minus 2 inches | 2 | Add to Cart |
| 1003-S | Cabinet Height minus 2 inches | 1 (optional) | Add to Cart |
A note on 80/20 finishes: 1002-S vs 1003-S
You will notice 2 different 80/20 profile types above. One of these has 3 open slots (part 1003-S) while all of the other lengths are part 1002-S which has 2 adjacent open slots. When assembling your cabinet, be sure that the open slots are placed on the insides of the framing as you need an open slot for fasteners. Or in other words, the “smooth” closed off channel side should be facing outwards.
How to Construct 80/20 Camper Van Cabinets
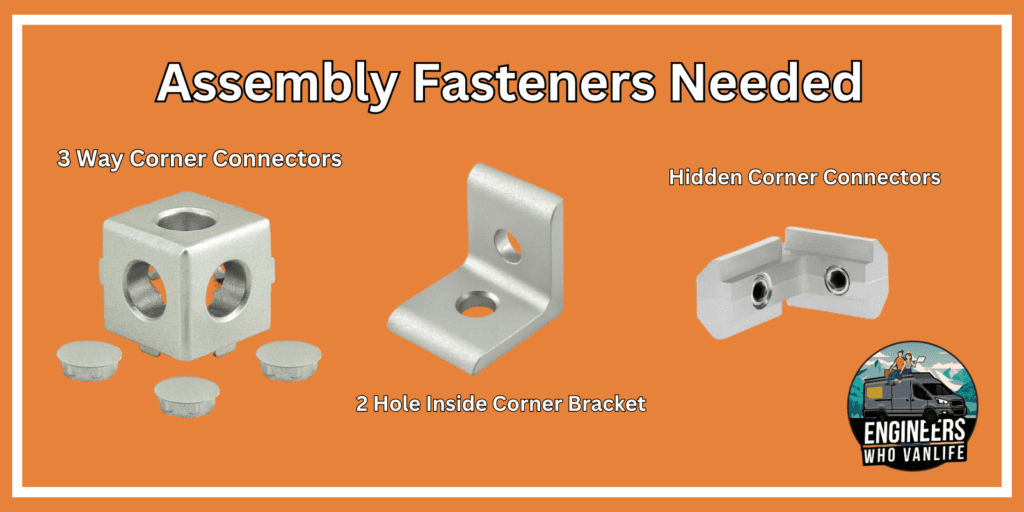
Constructing your camper van cabinets from extruded aluminum is simple with the correct hardware. We address this hardware below where you will find a color coded diagram, and explanations of each piece of hardware. Please note: this hardware is for constructing the cabinet, not mounting it, that will be covered next. While this post is focused on the basics of what you need to construct your cabinets, if you are interested we delve a lot deeper into fasteners in our Complete Guide to Van Building with 80/20.

3 Way Corner Connectors
For the front face of the cabinet, you will need 4 x 3 way corner connectors (and the associated hardware). These are placed in the 4 front corners (green in the diagram) connecting the “cabinet lengths” and “cabinet height” pieces.
To install these, you simply need to end tap the 80/20 profile lengths. Fo this, you can use this 1/4-20 end tap hand tool. It is important to note that in the top 2 corners, you will only have 2 lengths coming together, not three, which is okay, despite the name of the connector!
2 Hole Inside Corner Brackets
- If you have access to a drill press: use Anchor fasteners
If you don’t: use inside corner brackets + 2 (bolts + t nut) combos per bracket
Internal Fasteners [unlabeled above]
To place the final “cabinet height” length in the middle of the front of the cabinet, you will need internal fasteners: hidden corner connectors. You should use 4, one for each inside corner. These fasteners do not require tooling and are recommended because they fasten within the profile so they are hidden.
Shop Hardware:
| 8020 Part # | Description | # Needed | Link |
|---|---|---|---|
| 4042 | 3 Way Corner Connector | 4 | Add to Cart |
| 3017 | Hardware for 3 Way Corner Connector | 10 | Add to Cart |
| 3395 | Anchor Fastener Assembly | 2 | Add to Cart |
| 4119 | Inside Corner Bracket | 2 | Add to Cart |
| 3342 | .5″ /1/4-20 FBHSCS | 4 | Add to Cart |
| 3382 | Slide In T-nut | 4 | Add to Cart |
| 33440 | Hidden Corner Connector | 4 | Add to Cart |
How To Attach 80/20 Camper Van Cabinets to the Ceiling

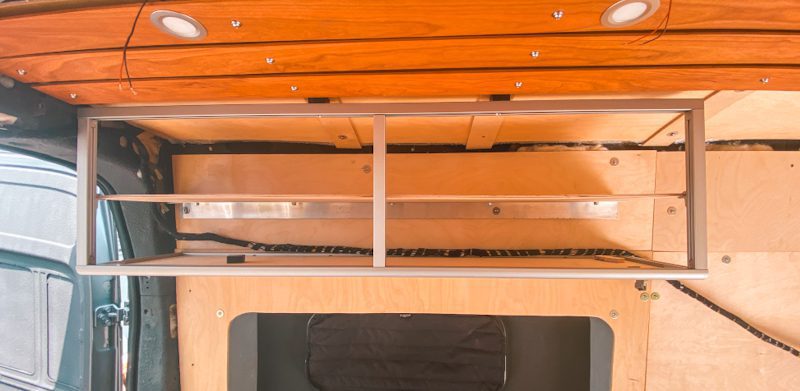
Your van cabinets will be mounted in two places, the ceiling, and the wall. Mounting to the ceiling is easy and requires nothing more than bolts and corresponding plusnuts inserted into your ceiling ribs. The result is shown above. To do this, you simply insert plusnuts into the ceiling beams and run bolts through the top of the frame into them.
When drilling through the 80/20 for your bolts, drill a:
- 5/16 inch hole for 1/4 inch bolt
- 3/8 inch hole for 5/16inch bolt
You maybe need to create a small shim (like the photo above) to get the perfect angle depending on your chassis. To do this, we use delrin bar cut to size and angled to the angle of our ceiling curve.
Shop Hardware + Tools:
| Description | Link |
|---|---|
| 1/4-20 Bolts (various sizes) | Add to Cart |
| 1/4-20 Plusnuts | Add to Cart |
| Plusnut Tool | Add to Cart |
| Delrin Bar | Add to Cart |
How to Mount 80/20 Van Cabinets to Wall
There are two options for mounting your 80/20 upper cabinets to your van chassis wall and we have outlined them below. Generally, there is not one mounting option that is stronger, so we recommend doing the one that you are most comfortable with.
Mounting Option 1

The first option for mounting your cabinets is to create brackets with angled aluminum and hang the brackets over a lip in the chassis wall cavity. This option requires machining of the angled aluminum brackets to have 2 holes for bolts into your 80/20 channels. You should have 3-4 brackets and attach them to the top channel of the back piece of 80/20 with bolts and t-nuts as pictured below.
We like this option as it provides a degree of freedom in tilt to get your cabinets to sit level.
Shop Mounting Option 1:
| Description | Link |
|---|---|
| 1.5″ Angled Aluminum | Add to Cart |
| 1/4-20 .375″ FBHSCS (bolts) | Add to Cart |
| Slide In Tnuts | Add to Cart |
Mounting Option 2

The second mounting option utilizes plusnuts in the van chassis wall and inside corner brackets from 80/20. This option allows for more freedom in placement as you can place a plusnut almost anywhere with the right tools.
With a plusnut tool, insert 2-4 plusnuts where the back of the cabinet bottom length is (see above). From there, run a bolt through an inside corner bracket and into the plusnut. Lastly, attach the cabinet to the inside corner bracket as shown in the diagram with bolts and t-nuts.
You can either place the cabinet on top of the bracket, or hang the cabinet from the bracket depending on your looks preference.
Shop Mounting Option 2:
| 8020 Part # | Length | # Needed | Link |
|---|---|---|---|
| 4119 | Inside Corner Bracket | 2-4 | Add to Cart |
| 3342 | 1/4-20 .5″ FBHSCS | 1 x bracket | Add to Cart |
| 3382 | Slide in T nut | 1 x bracket | Add to Cart |
| Plusnut tool | Add to Cart | ||
| Plusnuts | 1 x bracket | Add to Cart | |
| 1/4-20 Bolts | 1 x bracket | Add to Cart |

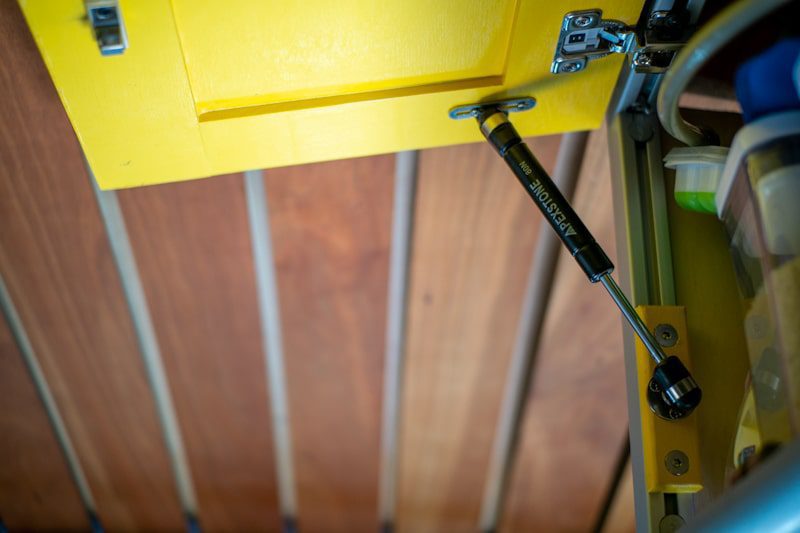
Faces, Sides, Gas Struts, & Hinges
Finishing your van cabinets will vary depending on your style. Generally, we recommend using 1/4 inch plywood for the sides and bottom. The channels of 80/20 lengths fit 1/4 inch plywood perfectly; therefore, you can cut it to size, and slide it in without hardware. For the cabinet front, we use European hinges and a hardwood frame on plywood backing for the cabinet face. Lastly, if you want gas struts, you can follow our Gas Strut Guide for sizing and options.
8020.net also offers cut to size acrylic panels which is a good option for the sides.
Order of Operations
Now that the basics are covered, we will cover the steps in order for constructing and installing your conversion van cabinets:
- Decide which mounting option from the above guide will work for your layout and chassis
- Determine & order 80/20 lengths and hardware needed using the above guide based on your layout and mounting type. By clicking through any link in this guide, a 5% off code for our community will be added to your cart!
- Assemble free standing cabinet.
- Insert needed plusnuts into ceiling beams. If mounting option 1 is chosen: assemble angled brackets. If mounting option 2 is chosen: insert plusnuts into wall
- Bolt cabinet to ceiling and mount to wall.
- Finish cabinet with chosen hinges, faces, and sides.
- Fill with your favorite things!
Continue With Other 80/20 Camper Van Modules!
That’s it! We hope you found this guide useful, and we welcome your feedback! If you enjoyed this, the next starter project we recommend is our 80/20 Bed System. See the full guide here! This one is great because it is a simple design, and sets you up for success to easily mount your water and electrical systems beneath it.

Thanks for being here! Happy building!
Eric + Colby
✉️ Join our mailing list for more content!
🙏🏽 If you are looking for more 1:1 van build help, we are here to help via Consulting or Travel Van Building.
[Start Here] Beginner Guides:


Comments 17
Hi! Could the front lower length be a quarter-round with 2 channels like the 1012 for a “smooth finish”?
Author
Yes! You will just want to get different connectors so it matches better.
Great website!! Question: have you seen 80/20 used to build support for overhead mule bags (e.g. the ones from Adventure Wagon that are secured using L-track)? We don’t want to tear out our existing build just to put in L-track for one mule bag… but is there a way to use 80/20 for a less-intensive mule bag structure, maybe?
Author
Hey there! After watching the video on how to install mule bags, I can’t imagine it would be too hard. Bolts slide into t-channels extremely easily, you might just need to find the right hardware if the l-track hardware isn’t the right size.
Hello,
I am in the process of building replicas of your design and came across this issue in your original design:
In the section, “Internal Fasteners”, for the internal cabinet height pieces which would require the 4 inside hidden corner connectors at the points of perpendicular. The cabinet height pieces in this design specify part 1002-S, which has 2 adjacent sides of the aluminum as a solid piece, thus preventing one side from a second corner connection. This design should have the internal height pieces as Part No. 1003-S because only the outward facing portion of the aluminum needs to be finished flat.
What are your thoughts here?
Author
Ahh yes I see the confusion. You should have 2x 1002-S for the outside pieces and 1 1003-S for the inside support piece. I will fix this now! It is not the end of the world if you have already purchased and need to only use 2 inside corner brackets on that inner piece 🙂
Thanks for the great article! Super helpful, going to order some of the 8020 through your link
Q: What hinges did you use for the upper cabinets and did you need to use any additional mounting plate or technique to get them to work with the 10 series?
Author
Hi Adam! We used these hinges with this mounting plate! We are big Blum fans, you can probably find cheaper options but these have held up super well.
Great article, thank you!
Q: Which hinges did you use and do they mount directly to the 8020 or did you have to get an extra mounting plate?
Thanks for the great article – currently looking into building these cabinets now. The three way corner connector seems fairly expensive for what it does. Is there any downside to just using 2 hidden corner connectors and adjusting the length of the 8020 accordingly?
Author
We find corner connectors to be the strongest and most reliable with the shaking that goes on in camper vans. Inside hidden corner connectors are not meant to be load bearing so I would avoid those!
If cost is the limiter, look at standard inside corner brackets. They will be visible but they are strong.
I’ve built my version of these cabinets a few months ago, not being hindered by any form of knowledge on the subject. The result is cabinets with more aluminum used than in this fine article, but that’s ok because I didn’t use real 8020, which is BTW unavailable in mainland Europe. It’s called extruded aluminum here, and is available at a fraction of the price. The dimensions are the same, but there’s much less variations and options available. The result therefore looks somewhat “industrial” but stll very cool.
Author
Thanks for sharing! I have heard that a few times lately about different suppliers, we are working on rewording these guides to be more inclusive.
Hello. I am mid cabinet build currently. Did you ever consider using a pivot joint to connect the top bar to the vertical ones and not have to deal with a shim?
Author
Hey Cassie! That is an option, just make sure you use proper thread locker so it doesn’t come loose and go swinging around.
thank you so much for taking the time to build these tutorials, simply amazing, ty ty
Author
I am glad you like!