
How To Build an 80/20 Shower in a Bench Module
If you are want to include a shower in your camper van, but don’t want to dedicate floor to ceiling space for it… a shower in a bench is your solution! This guide provides schematics and directions for how we built ours out of extruded aluminum (80/20).
** Disclaimer: This blog post contains various affiliate links that provide a small kickback to us, at no additional cost to you. We truly appreciate your support if you choose to purchase through these! **
What is a "Camper Van Shower in a Bench"?
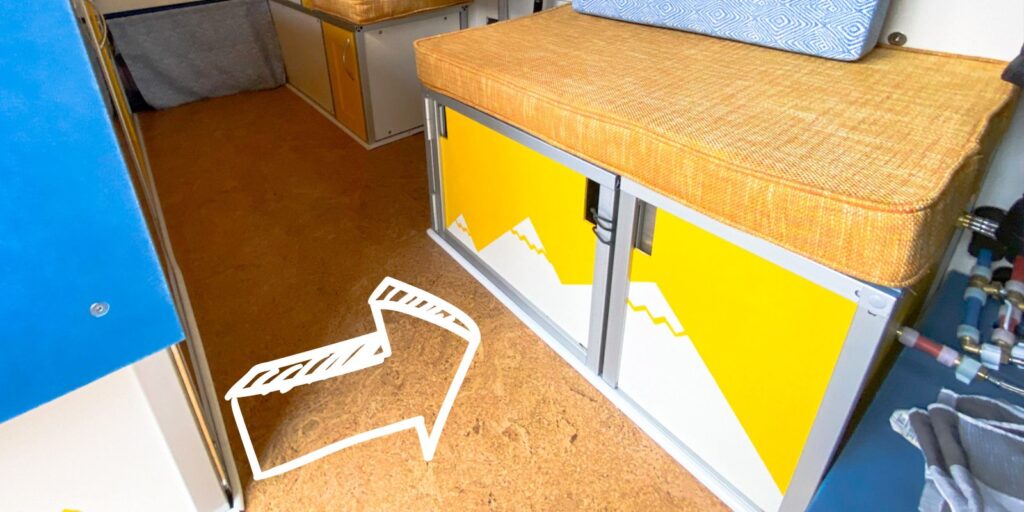
A shower in a bench is a bench during the day that stores a composting toilet, and a pop up shower when you need one!
Why is a shower in a bench good for van life?
One of the most debated topics for camper van conversions is if you include a shower or not.
- You can build a full standing shower, but you would lose a huge footprint from floor to ceiling.
- You could go with an outdoor shower (we did this in our first rig), but then.. winter.
A shower in a bench is the happy medium where you still have a full shower, but you don’t lose the floor to ceiling space that a complete shower needs.
Not exactly what you are looking for?
We have a complete guide to van life shower options!
What does this guide include?
This is a step by step guide to building the structure of your shower in a bench. It will include a full parts list and assembly directions. This guide will not include plumbing as that is covered in our Camper Van Water System Guide.
Camper Van Water System Guide
Learn more!
Parts List for a Camper Van Shower in a Bench
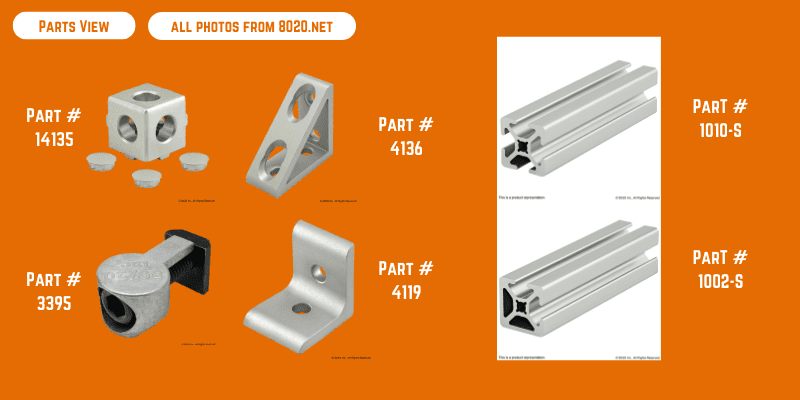
Itemized below is all of the hardware, and extruded aluminum lengths needed to complete this project. Most of the extruded aluminum used is 10 series with 2 adjacent open t-slots (part #1002-s), with a few of 4 open t-slot lengths (part# 1010-s).
This style allows you to use all of the fasteners and add plywood in the channels, while maintaining a sleek look on the outside.
Shop all Hardware Needed:
| 8020 Part # | Description | # Needed | Link |
|---|---|---|---|
| 14135 | 3 Way Corner Connector Light | 4 | Add to Cart |
| 3063 | Hardware for 3 Way Corner Connector | 12 | Add to Cart |
| 3395 | Anchor Fastener Assembly | 14 | Add to Cart |
| 4136 | 4 Hole gusseted corner bracket | 2 | Add to Cart |
| 4119 | Inside Corner Bracket | 2 | Add to Cart |
| 3393 | Bolt assembly (for all corner brackets) | 10 | Add to Cart |
| — | 1/4-20 plusnuts | 2 | Add to Cart |
| — | 1/4-20 1.5″ bolts | 2 | Add to Cart |
| 2325 | Concealed Hinges | 2 | Add to Cart |
| 13-6710 | M6 x 10mm FBHSCS (for hinges) | 8 | Add to Cart |
| 25-1961 | M6 x slide in t nut (for hinges) | 8 | Add to Cart |
Shop all 80/20 Lengths Needed:
| 8020 Part # | Length | # Needed | For: | Link |
|---|---|---|---|---|
| 1002-S | 32″ | 2 | Base, long | Add to Cart |
| 1002-S | 20″ | 4 | Base + top, short | Add to Cart |
| 1002-S | 15″ | 5 | Vertical | Add to Cart |
| 1002-S | 30″ | 1 | Top long | Add to Cart |
| 1010-S | 30″ | 1 | Side long | Add to Cart |
| 1002-S | 10.5″ (buy 11″ + cut) | 1 | Top, front | Add to Cart |
| 1002-S | 19″ | 1 | Door, top | Add to Cart |
| 1002-S | 17″ | 1 | Door, bottom | Add to Cart |
| 1002-S | 14.75″ (buy 15″ + cut) | 2 | Door, side | Add to Cart |
Estimated Total Cost: $350
This factors in our 5% discount that is applied to your cart automatically if you click through any link on our blog. This price includes all of the above materials, but does not include your finishings (plywood + shower pan, curtain, etc) as those vary greatly!
How to Build a Shower in a Bench
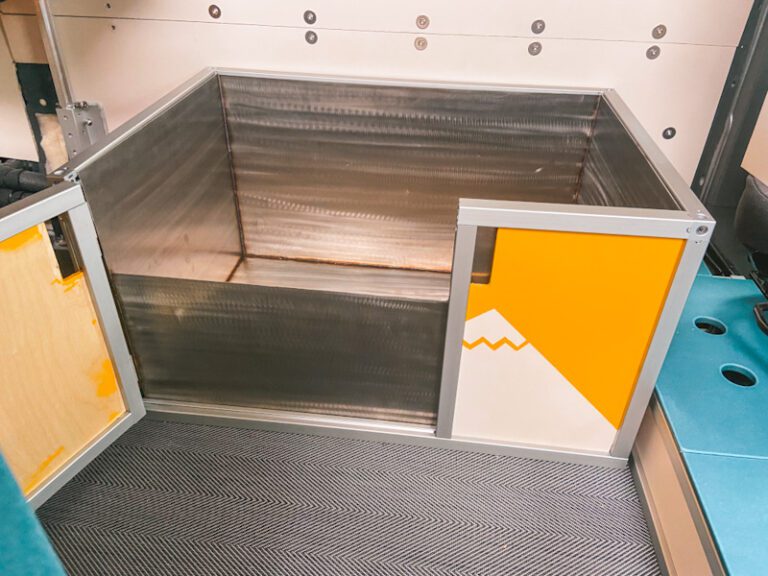
Below you will find the diagrams for how to assemble your shower in a bench box using the parts list above. Please keep in mind that the overall dimensions of our box are 32″L x 20″W x 17″ H which results in a shower standing room of 30″ x 20″. You can adjust everything proportionally to fit your needs.
Our guiding principles when designing this were
- To fit our composting toilet
- To be large enough for us to move our arms around when showering

Build Diagrams
Our shower in a bench is 32″ x 22″, giving us 30″ x 20″ of interior space to shower in. It is 17″ tall (without the Paperstone cover). Below, we will walk through all of the diagrams needed to assemble.
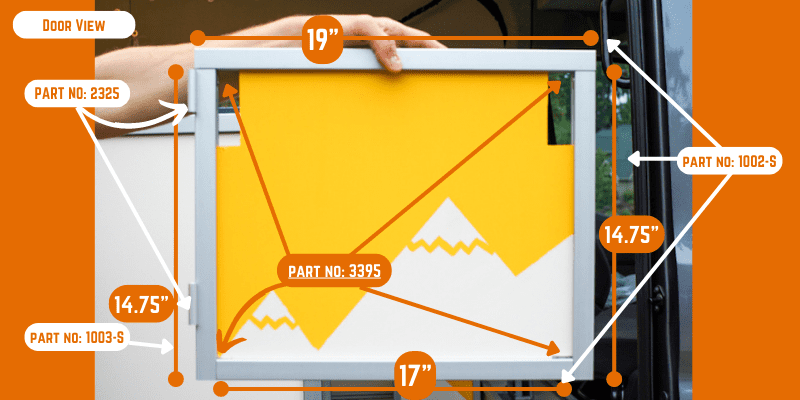
Door view
This is a great place to start as it is a basic rectangle, and it can be made separately and attached afterwards. We opted for the concealed hinges (part# 2325) so that it closes nicely.
We keep our door closed with a bungee cord, but have also tested magnetic strips along the door jam which works, as well.
Top view
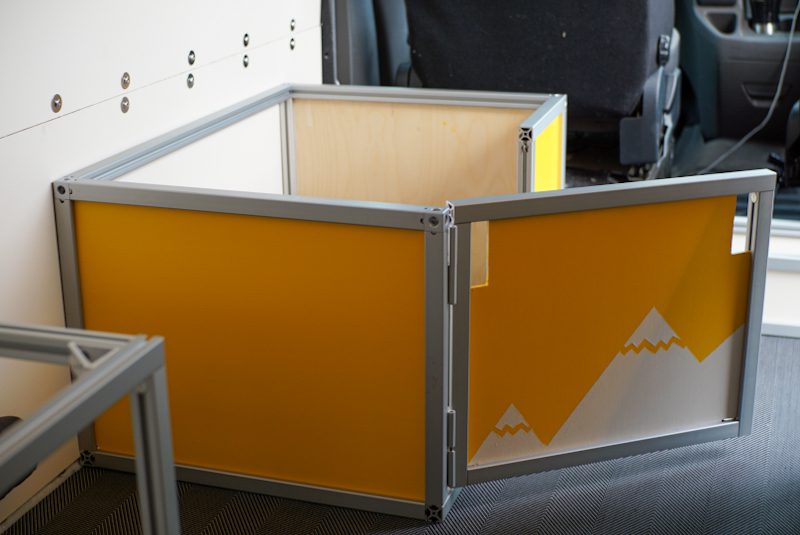
The top view of the shower in a bench assembly is the most complex, but do not worry, as long as you have the basic dimensions correct, it will all fall into place.
The basic concept is a 32″x 22″ rectangle on top made with 10 series extruded aluminum. We utilize profiles with 2 adjacent open t-slots (part 1002-s) so that the sides that show have a smooth finish, but the open slots still allow for hardware and plywood to be inserted. It is also important to note that the top rectangle is fastened together with 3 way corner connectors of which take up 1″ so all lengths must be adjusted to account for that.
Securing the shower bench to the chassis
Across the back there is 1x 30″ 10 series length that is used for securing the shower to the camper van chassis wall. This profile is the only 1010-s profile which means that all t slots are open. We secure the 30″ length to the shower with 2x 4 hole gusseted corner brackets supporting the profile from the bottom. Then, we preload 2x inside corner brackets (part 4119) that we run a 1.5″ bolt through into plusnuts that we pre loaded into the van chassis wall.
Additionally, you could anchor your bench to the floor with the same inside corner brackets and bolts. This is a method that we utilize for other modules in our van build.

Bottom view
15″ vertical supports join the top with the base rectangle. For the base rectangle we do not use 3 way corner connectors like we do on top. Instead we utilize longer profile lengths and 2 anchor fasteners per corner. If you do not have a drill press, or a way to machine the anchor fasteners, you should use 3 way corner connectors on the base. If you do this, Be sure to adjust the length accordingly like the top of the shower as we describe below.
For the base rectangle you need 2x 32″ and 2 x 20″ 10 series lengths with 2 adjacent open t slots. However, if you decide to use 4x 3 way corner connectors instead of 8 anchor fasteners, you will only need 2×30″ and 2×20″ lengths.

Sides of Shower in a Bench
The beauty of using 10 series extruded aluminum is that 1/4″ plywood fits perfectly in the channels, so that is exactly what we used. Of course, we painted, and sealed all pieces with polyurethane as it will be exposed to water frequently. You will notice some cutouts that you will also need to do in order to access your anchor fasteners for tightening.
Reminder to use thread locker
As always when working with extruded aluminum for your van build, you should put thread locker on each bolt once final assembly is ready. This prevents rattling noises and loosening when driving.
Complete Guide to Building
Your Van with Extruded Aluminum
Shower Pan Options
It’s actually quite difficult to find shower pans that work for the small dimensions of camper van shower bases. For our shower pan, we invested in 16 gauge stainless steel that we had welded into a shower pan to fit this base. One regret we do have about this route is that the water doesn’t drain well. It is best to find something sloped to the drain.
Other options include:
- Etsy custom shower pans
- Custom fiberglass pans
- Stainless Steel Washing Machine Pans (You will most likely need to develop your dimensions around what you can find for this option).
How to Plumb Your Shower in a Bench
Plumbing this shower into your existing camper van water system requires:
- Additional PEX plumbing to reach your shower
- Marine Mixer Valve
- Water Efficient Shower Head
Simply route your existing plumbing lines to the two inputs of your marine mixer valve. Then route the output of your marine mixer valve to your shower head. The end! (See diagram below)

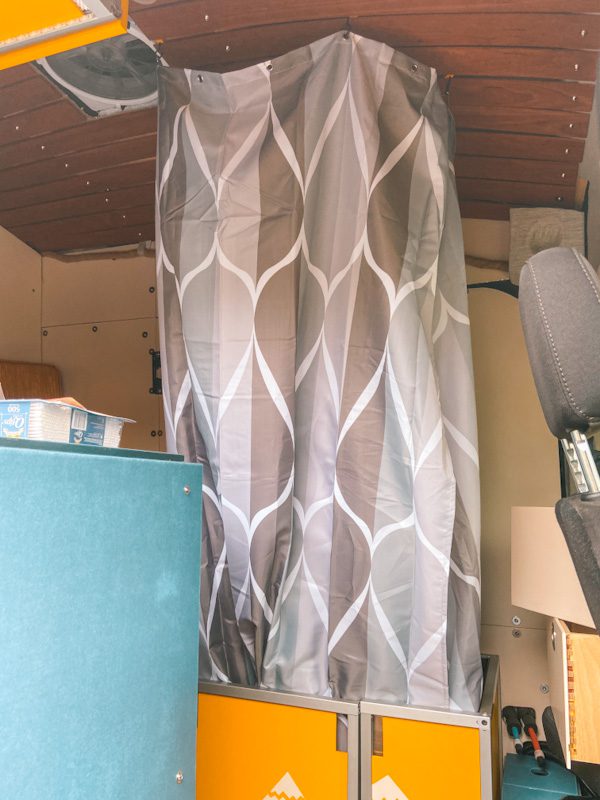
Shower curtain
The shower curtain must be an extra wide shower curtain so that it wraps around fully. It will be stored inside of the shower box and then we will hang the curtain onto 5 Q-Hooks mounted on our ceiling.
[2023 Update] We decided to replace 4 ceiling bolts with eye-bolts, and now we attach the shower curtain to those with carabiners.


80/20 DIY Van Build Module Guides:
Below you can find specific step-by-step guides to building modules in your camper van with extruded aluminum. If you are looking for a starter project, the bed system, or upper cabinets are excellent places to begin.
Looking for specific assistance? We offer Virtual Consulting and love talking with our community about building vans with extruded aluminum. One of our more common consults is about reviewing your extruded aluminum designs before purchasing.
Thanks for being here! Happy building!
Eric + Colby
✉️ Join our mailing list for more content!
🙏🏽 If you are looking for more 1:1 van build help, we are here to help via Consulting or Travel Van Building.
[Start Here] Beginner Guides:


Comments 4
Hi!
Thanks a lot for the great post and guide, we are planning a similar to our van.
How do you deal with the grey water, where does the water go after showering?
Best regards,
Author
You can plumb your shower to your grey tank. We personally have our shower water drain directly out the bottom of our van. This is common. Just be sure to only shower in places where it is safe to dump (biodegradable) soaps.
Hi – great post! We’re looking for a way to create an indoor shower for the winter 🙂
One thing I couldn’t see in the post though… what do you actually use for the shower setup? I can see the box and the curtain, but what about the water/shower system? Thanks!
Author
Hello! Great point, we will add that. We stem off our existing PEX A water system. First, the hot and cold lines go to a marine mixer valve, and then the output of the mixer goes to a handheld shower hose that has an on/off button.