
How to Fasten Panels to Your 80/20 Modules in Your DIY Camper Van Conversion
Building your camper van modules out of extruded aluminum (80/20) is a smart choice to keep your van build lightweight, strong, and long-lasting. While there are many benefits to using 80/20, it does make paneling more difficult than traditional wood construction where you can simply nail and screw things together. Thankfully, after two conversion van builds and trying many different techniques, we are happy to share with you the two best options. You can choose between them based on your visual preference:
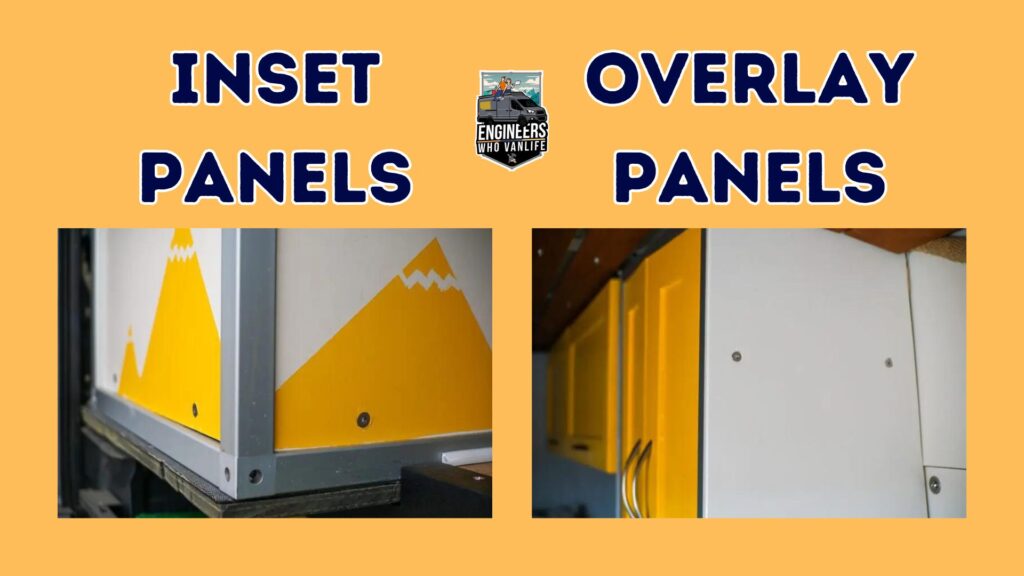
- Inset Panels
- Overlay Panels
** Disclaimer: This blog post contains various affiliate links that provide a small kickback to us, at no additional cost to you. We truly appreciate your support if you choose to purchase through these! **
2 Methods for Fastening Panels to 80/20
While you may stumble upon other methods for fastening panels to your 80/20 modules, we believe the two methods below are the simplest, and cleanest:
- The first method results in inset panels so you will see the 80/20 profile.
- The second method results in overlayed panels, hiding the 80/20 profiles.
Choose wisely! (Just kidding, we actually have both methods in our latest build and love each for different reasons).
Method 1: Inset Panels
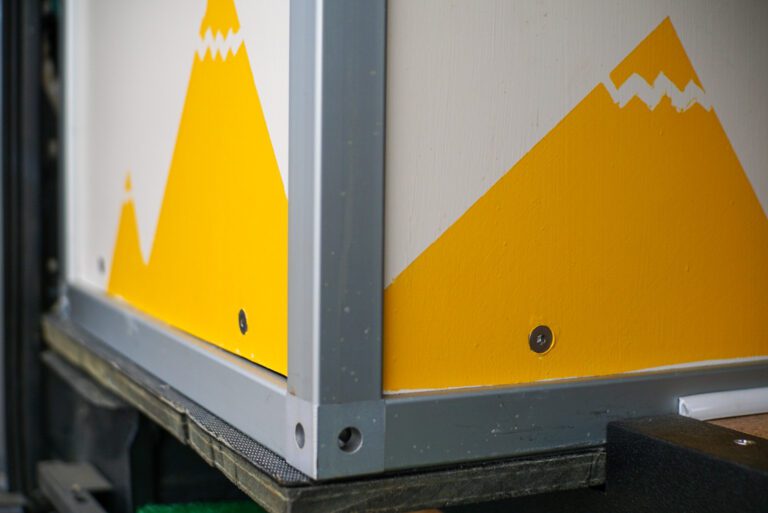
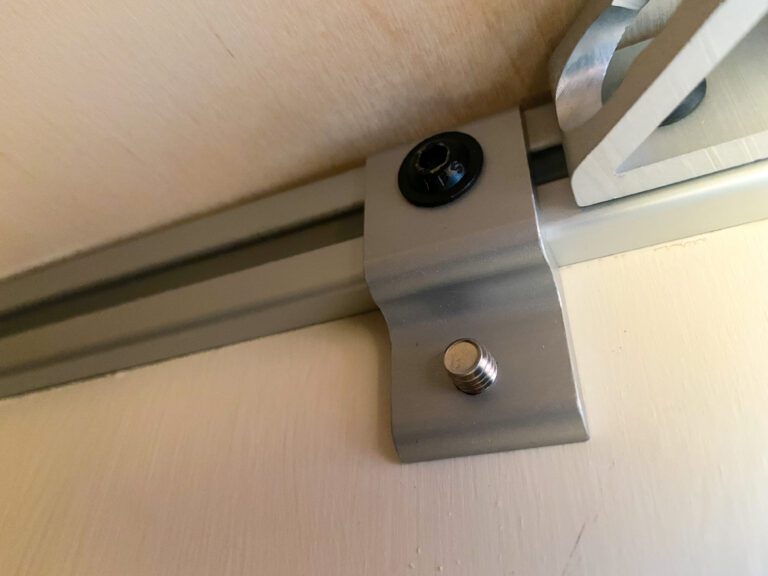
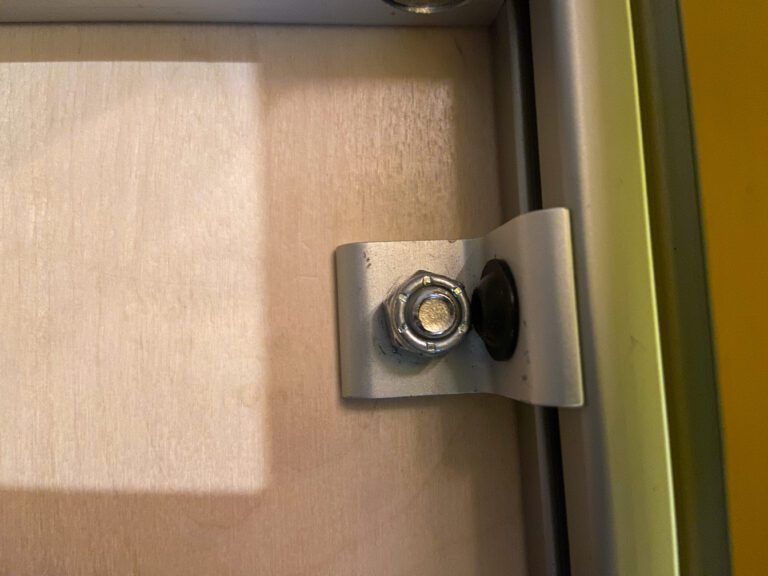
80/20 offers specific panel mounting brackets (retainers) for fastening panels to 80/20 profiles as inset panels. These panel mounting brackets have a standard bolt hole on one side, and a threaded hole on the other end [hardware list below].
- The bolt hole side is for attaching the bracket to your profile with a bolt and t-nut.
- The threaded bolt hole is for attaching to your panel
In order to achieve perfect inset panels, you should cut your panel 1/16″ to 1/8″ inch smaller than your X-Y opening. The tighter the better, of course, but with wood, you also want to keep in mind that it will expand so somewhere in the above range should be good.
How to Install Inset Panels on 80/20
To install inset panels:
- Measure where your panel brackets will go on your panel.
- Drill holes through your panel in the appropriate location.
- Use a countersink drill bit to recess your bolt head into the panel. Your bolt hole size can be 1/16″ of an inch larger than your bolt size.
- Secure panel bracket to back inside of 80/20 profile (see photo below).
- Run countersunk bolt through panel and unto panel bracket.
Hardware and Tools Needed
Below we will break down hardware needed for each option: 10 series, and 15 series 8020. These are the two most common profile types used in DIY Van Building, and you can read about the differences in our Guide to Van Building with 8020.
10 Series Hardware & Tools Needed
- 10 series Single Arm Narrow Panel Retainer Bracket
- 1/4-20 Roll in T nut (1 per bracket)
- 1/4-20 .5″ FBHSCS (1 per bracket)
- 1/4-20 .75″ counter sunk bolt (1 per bracket) Note: Counter sunk bolt length might need to be adjusted with thicker panels!
- 1/2″ Counter Sunk Drill Bit (set linked or get single at local Ace)
- 5/16″ Cobalt Drill Bit (for countersunk bolt holes)
- 5/32 Allen Wrench ball driver
15 Series Hardware & Tools Needed
- 15 series Single Arm Narrow Panel Retainer Bracket
- 5-16/18 Roll in T nut (1 per bracket)
- 5-16/18 .687″ FBHSCS (1 per bracket)
- 5-16/18 1′ counter sunk bolt (1 per bracket) Note: Counter sunk bolt length might need to be adjusted with thicker panels!
- 5/8″ Counter Sunk Drill Bit (set linked or get single at local hardware store)
- 3/8″ Cobalt Drill Bit (for countersunk bolt holes)
- 3/16 Allen Wrench ball driver
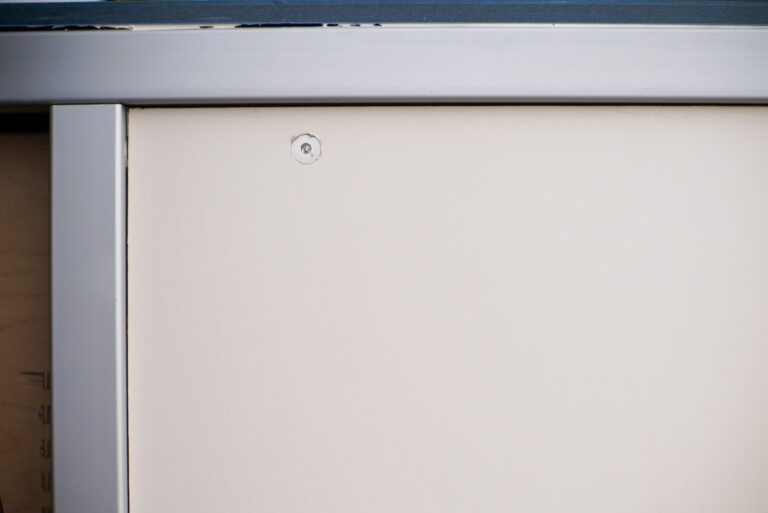
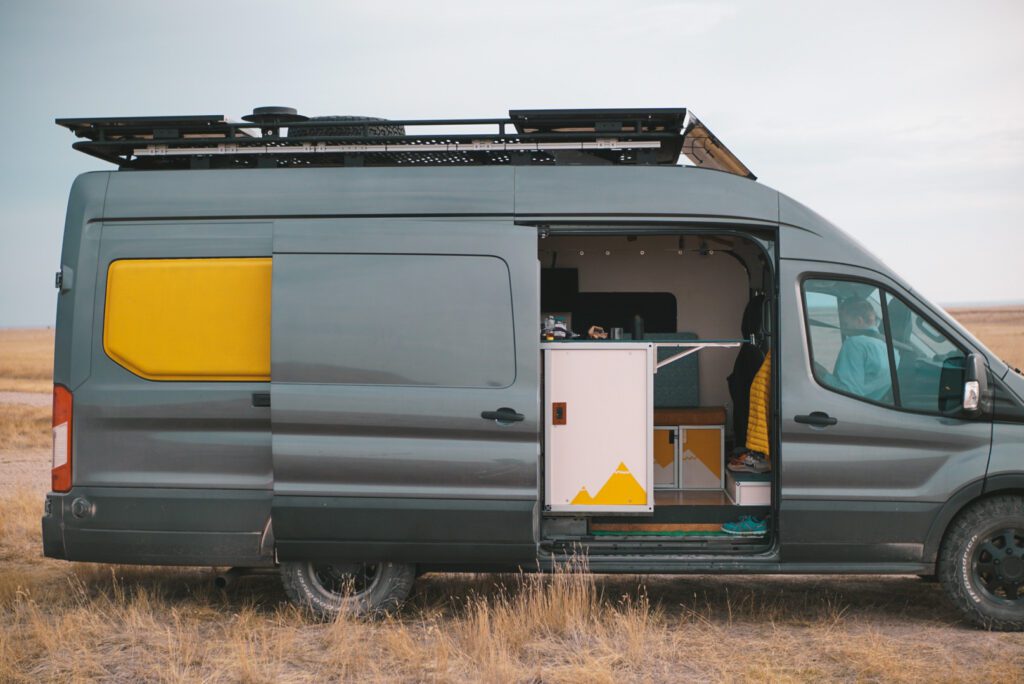
Method 2: Overlay Panels
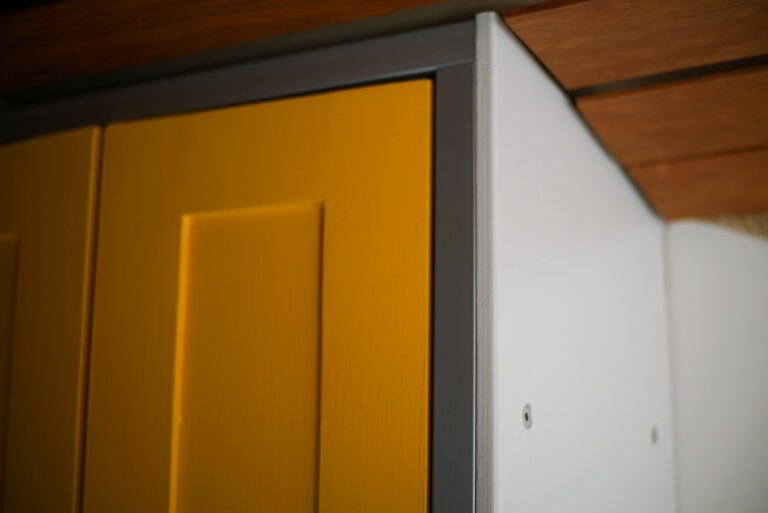
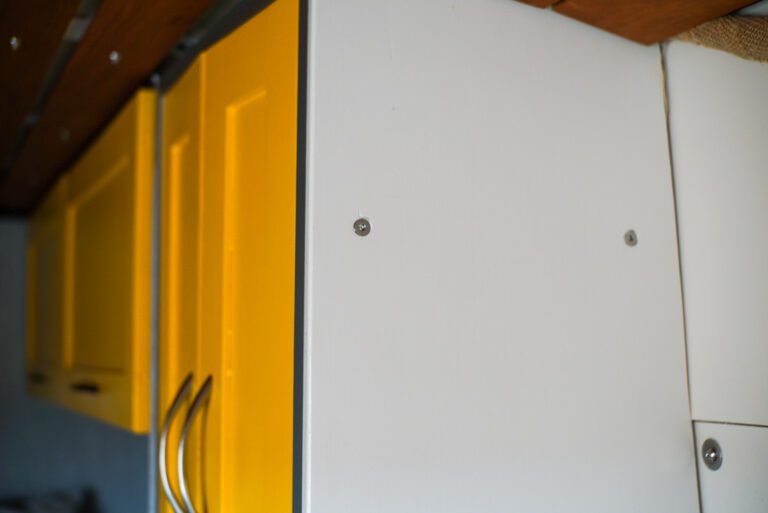
If you want to hide your 80/20 profile, you can oversize your panels, cover the 80/20 pieces, and use standard 2 hole corner brackets so that the panel sits flush against your profile like the white panel above.
How to Install Overlay Panels
- Align and drill the holes in the panel the same way as described in method one.
- Attach corner bracket to perpendicular 80/20 profile slot with bolt and roll in t-nut.
- Run a counter sink bolt through your panel and secure with a nylock nut to fasten the panel to the corner bracket.
- Optional! Routing the outer edges of the panel can give a clean and finished look (see photos).
For this option, you want to size your panel to go from end to end of the profiles, not the inner section.
Hardware and Tools Needed
10 Series Hardware & Tools Needed
- 10 series 2 Hole Inside Corner Bracket
- 1/4-20 Roll in T nut (1 per bracket)
- 1/4-20 .5″ FBHSCS (1 per bracket)
- 1/4-20 counter sunk bolt (1 per bracket) Length should be thickness of panel + 1/2″
- 1/4-20 Nylock Nut (1 per bracket)
- 1/2″ Counter Sunk Drill Bit (set linked or get single at local Ace)
- 5/16″ Cobalt Drill Bit (for countersunk bolt holes)
- 5/32 Allen Wrench ball driver
15 Series Hardware & Tools Needed
- 15 series 2 Hole Inside Corner Bracket
- 5-16/18 Roll in T nut (1 per bracket)
- 5-16/18 .687″ FBHSCS (1 per bracket)
- 5/16-18 counter sunk bolt (1 per bracket) Length should be thickness of panel + 5/8″
- 5/16-18 Nylock Nut (1 per bracket)
- 5/8″ Counter Sunk Drill Bit (set linked or get single at local Ace)
- 3/8″ Cobalt Drill Bit (for countersunk bolt holes)
- 3/16 Allen Wrench ball driver
How many panel brackets do you need?
The number of panel brackets to use is partly up to user discretion. Generally, you will need more panel brackets for larger and thinner panels, and fewer for smaller and thicker panels. For reference, we use 4 for our larger galley panels, and 3 for smaller side panels.
Panel Size and Material Type
Panel material selection for your camper van modules is dependent on application, and design preference. For example, you may encase your van electrical system with polycarbonate sheet, but you may want to use veneer or painted plywood for your main kitchen galley. Either decision will result in the same panel attachment options described above.
Standard plywood thicknesses are 1/4 – 1/2” for camper van applications. Polycarbonate / Composite finishes are generally 1/8”-1/4”. Use 1/2” plywood for larger panels where you need rigidity, or where you will be mounting other accessories. Use 1/4” for smaller pieces where it is good to save on weight and cost. This is also a good place to mention that if a side of your galley is not seen, you do not need to add a panel; the weight savings, and the airflow through your van is well needed.
80/20 DIY Van Build Module Guides:
Below you can find specific step-by-step guides to building modules in your camper van with extruded aluminum. If you are looking for a starter project, the bed system, or upper cabinets are excellent places to begin.
Looking for specific assistance? We offer Virtual Consulting and love talking with our community about building vans with extruded aluminum. One of our more common consults is about reviewing your extruded aluminum designs before purchasing.
Thanks for being here! Happy building!
Eric + Colby
✉️ Join our mailing list for more content!
🙏🏽 If you are looking for more 1:1 van build help, we are here to help via Consulting or Travel Van Building.
[Start Here] Beginner Guides:


Comments 9
I used LVT inside the Tslot, no screws in the LVT for walls, ceiling and doors in my bathroom. Use panel gaskets to secure. This provides a nice finished look
If you really want to avoid penetrations (bolts) through the overlay panels, place your angle bracket in the T channel and on the side against the overlay, use marine adhesive. You will need to clamp or somehow hold the panel in place for 24 hours (if not cold outside) but the marine adhesive is both flexible and incredibly strong bond. Any adhesive that squishes through the bolt hold (that you are not using) also increases strength. This is presuming your panels are lite like 1/4” luan (plywood) or small. This is what I plan to do. I have used this method in similar applications and was impressed with the strength. (Clean surfaces to start obviously)
Author
Thanks for sharing, very innovative! We will give it a try in our next module.
Thanks for all your explanations! I was wondering, is it possible to use method #2, with overlay pannels, but with no visible screw from the outside? Thanks a lot!
Author
Hi there! That would be pretty difficult… you can absolutely paint over them though! We’ve seen folks do that even with whole 80/20 profile.
When doing the overlay, why not just bolt the panel directly to the t-channel slot on the profile?
Author
Hi Jesse, great callout! You definitely can, but must use roll in t-nuts and counter sink bolts. The difficulty with this option is you need to hall the roll-in t-nuts in the exact right spot for all attachment points because as soon as you place the panel, you will lose access to sliding the t-nuts up on down to align with the bolt holes. However, if you are willing to spend the extra time there, it’s a great way to save a few $$ on brackets 🙂
Thanks for all the great information.
When using method 1, what t-nut connectors are cleanest? L or anchor or ?
Also, do you really need a bracket for method 1 if you get a nice tight fit of the panel in the slots?
Thanks!
Author
Hi Robert! Ah you are referinng to sliding into a channel which is different than option 1 which is inset with a panel bracket.. When using a panel bracket, you cut the panel 1/16″ smaller than the x-y opening and the bracket holds it hovering in place. If I am understanding your question correctly, yes, you can also slide a panel into the T-slots and in this case you do not need hardware. We do this often for the bottom of our cabinets as the weight also helps hold them in place. Let me know if you need further clarification.