Truck Bed Liner and Raptor Liner for Your DIY Camper Van
Some of the best days of van life are spent off road and we want our camper vans to stand up strong to all the elements that brings. Applying raptor liner, or truck bed liner, on your camper van exterior is a simple step you can to increase the durability of your camper van exterior. In this guide, we cover what truck bed liner is, where to apply it on your camper van, and how to apply it.
Project Cost: ~ $200 depending on where you choose to apply
Project Complexity: very DIY friendly
Project Time: 1-2 days
** Disclaimer: This blog post contains various affiliate links that provide a small kickback to us, at no additional cost to you. We truly appreciate your support if you choose to purchase through these! **
What is Raptor Bed Liner (or truck bed liner)?
U-POL Raptor Liner is a two part, flexible urethane coating that is applied with an air compressor and spray gun. Being a flexible coating, it will not chip when hit with a rock, someone else’s door, or those pesky tree branches you encounter driving down forest roads.
Raptor Liner is a type of truck bed liner. Some alternative truck bed liners that you might see are Rhino Bed Liner and Bullet Liner.
Black vs Tintable Raptor Liner - Which is right for you?
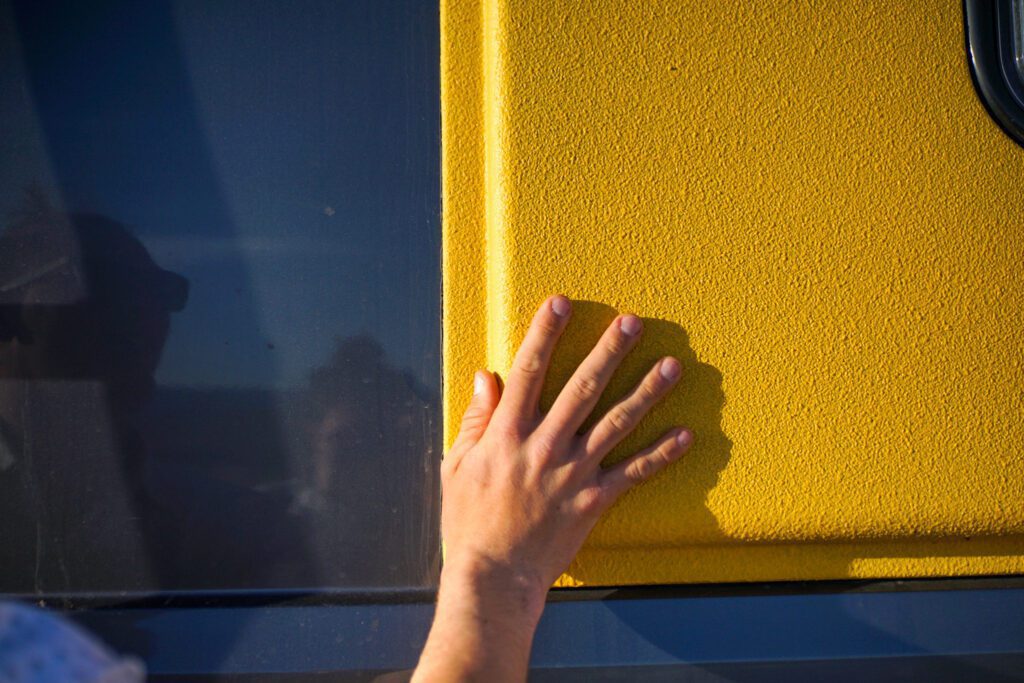
Raptor Liner comes in two varieties: Black Raptor Liner and Tintable Raptor Liner. Black Raptor Liner is the most popular version that most people use for their lower trim pieces and hood. We chose it because it is a great black color, already comes pre-mixed, and it readily available. However, you may want a custom color for your special van project, in which case Tintable Raptor Liner would be the better option. In our DIY Flare Install Guide, you can see how we utilize Tintable Raptor Liner ourselves.
Tintable Raptor Liner – How to Color
Coloring the Tintable Raptor Liner is easy – all you have to do is go to any automotive paint supply store and get an acrylic based paint tint. You can pick any paint, or color sample, you want from your favorite big box store and the automotive department will be able to perfectly match the color for you, so the possibilities are really endless! This is how we ended up with yellow Raptor Liner-ed flares. Be sure to have them NOT add any binding agents to the paint tint. You should only need one pint of acrylic based tint because you add 10% tint by volume to the Tintable Raptor Liner bottle.
Why apply Raptor Liner to your camper van?
Rust
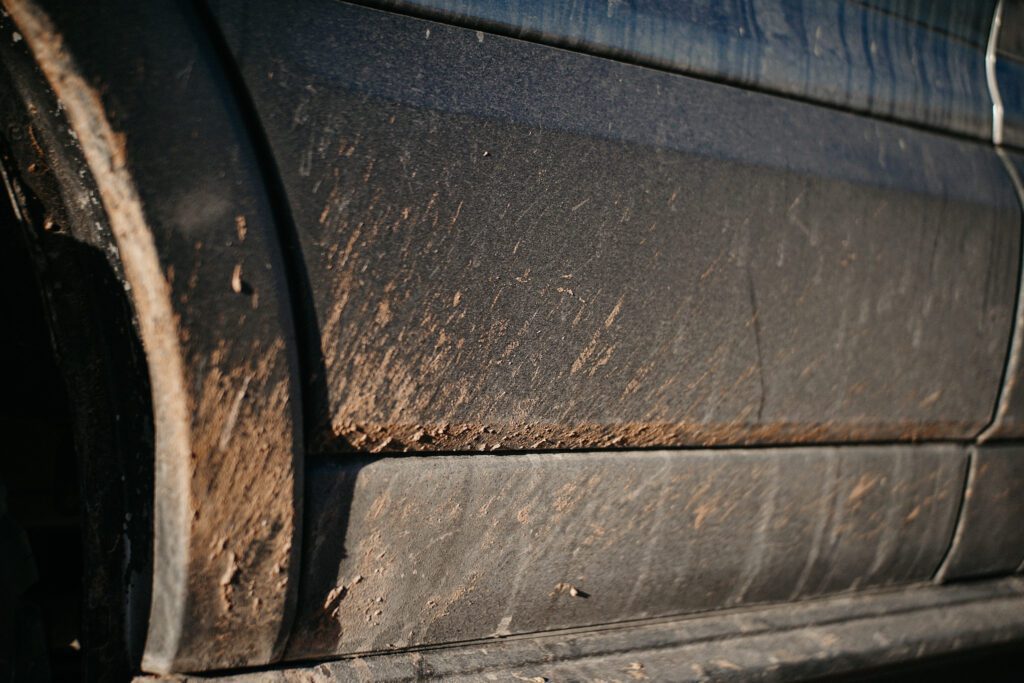
The goal of any adventure camper van is to hold up to the rough conditions you put them through. For many, you will be driving down long dirt roads and putting a lot of miles on your camper van as you traverse states, countries, and even continents. All those miles are going to make rock chips to your OEM paint inevitable.
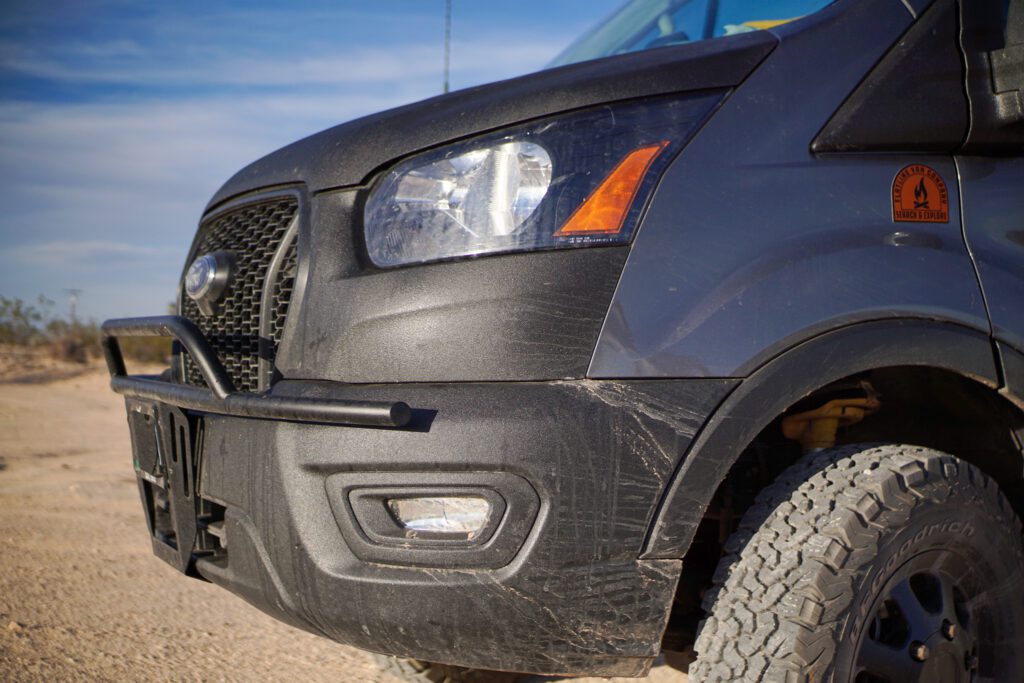
In particular, your lower rocker panels, hood, and flares (if you have them) are especially susceptible to rock chips and branch scrapes. The lower rocker panels get rocks kicked up from the road, your hood is a large target for rocks kicked up from vehicles in front of you, and your flares stick out wider than your van body and are constantly getting scraped by branches if you like getting off road. Eventually, every scratch, chip, and crack that is deep enough into your paint will start to rust – and rust is your worst enemy when it comes to a van build! If you’re looking to buy any sort of used vehicle, you already know that rust is one of the first things you should be wary of because once it starts, it’s nearly impossible to stop!
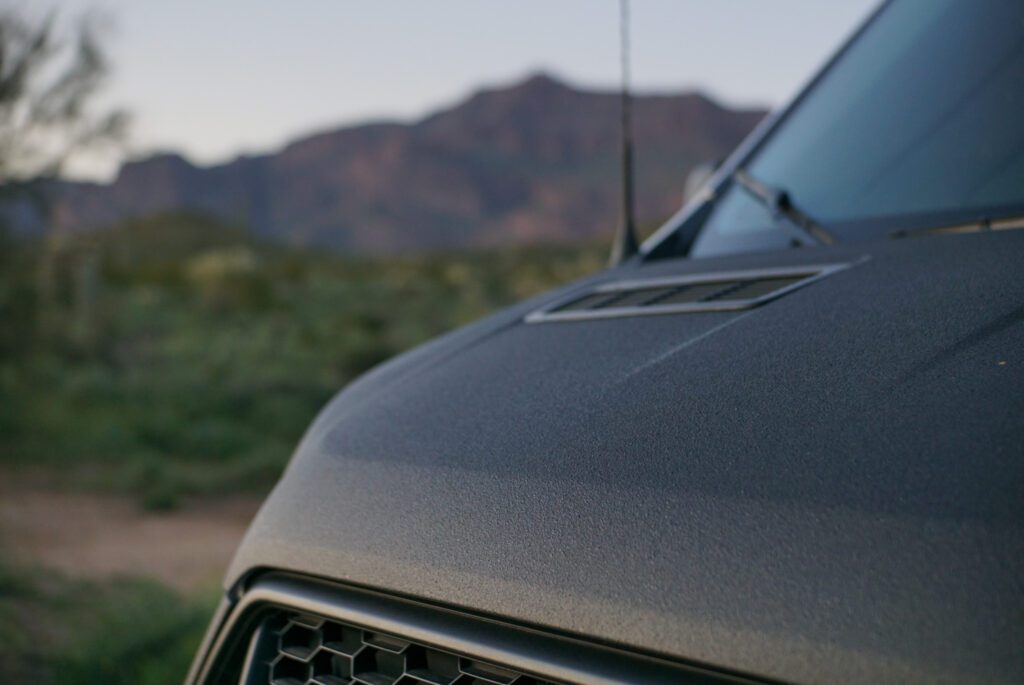
Fading Plastic
The second mechanism of guaranteed wear and tear on your van is more cosmetic than functional. The plastic trim used on all major cargo vans comes out of the factory looking nice and shiny, but quickly becomes sun bleached and turns a dull whitish grey – not the best look for your new campervan home.
Why DIY Raptor Liner Your Campervan (vs. Professional)?
Luckily, all that preventing the two above issues involves is project that you can tackle in a weekend for around $200 in consumables! That solution is, applying U-Pol Raptor Liner to your camper van. If you outsource this to the professionals, you can expect to pay between $4,000 and $6,000 depending on vehicle length and whether you also want your hood and/or flares also done.
As you can see, the markup for this kind of service is huge, which makes it a huge value add to your van and at an extremely affordable price. Further, this project doesn’t require a high level of skill to complete therefore is a very easy DIY upgrade for you to tackle in your driveway.
Where Should Your Apply Raptor Liner On Your Van?
Now that we know why you should apply Raptor Liner, or truck bed liner, to your campervan. Let’s talk about WHERE and HOW to apply Raptor Liner.
Apply Raptor Liner To Your Camper Van’s Plastic Trim and Rocker Guards
At a minimum, you should consider applying Raptor Liner to the lower rocker guards and all the plastic trim on your van. This will prevent those pesky rock chips from rusting on your rocker panels. Having the trim pieces done will also increase the resale value of your van due to its newly increased curb appeal.
Apply Raptor Liner To Your Camper Van’s Hood
Because 90% of the work in applying Raptor Liner is the setup, we often recommend going all out because the marginal cost and effort is so small. Therefore, the hood is also a really great piece to have coated. The steep angle of the hood on cargo vans makes them a much larger target on the road for rocks kicked up by vehicles in front of you. Trust us, our hood was hit by a good sized rock within the first 10,000 miles of our journey!
Apply Raptor Liner To Your Camper Van’s Flares
After applying raptor liner to your lower trim and hood, the only other piece you might want coated are the flares, which can be done either before you install them, or after depending upon your situation.
Related Guide:
How To DIY Install Camper Van Flares
How to DIY Raptor Liner Your Campervan
You will need both the consumables for this project as well as a small collection of tools to get the job done. Raptor Liner comes in large 1 gallon kits as well as small aerosol cans. The aerosol cans are ideal if you only have a very small area to cover, do not have an air compressor, or need to do touch up work on an existing truck bed liner. Using the gallon kits will be more economical AND yield a better finish texture, so if you are doing your van for the first time it is what we recommend.
Consumables
- 1 Gallon set of black raptor liner
- Application Gun (if kit doesn’t include)
- Adhesion Promoter
- 4x Plastic Drop Cloths
- Wide Painters Tape
For tintable raptor liner instructions and supplies, see our DIY Flare Install Guide.
Tools
- Air Compressor – 6 gallon / 150 psi
- 180 grit sand paper
- Isopropyl Alcohol
- Safety goggles
- 3M respirator mask
- Rubber gloves
- Some work clothes that can get dirty (here’s a great budget option 😀 )
How to Apply Raptor Liner on Your Campervan
Prep your work area
Before you can get to the fun part of spraying the Raptor Liner, you need to first prep your entire vehicle and work area with plastic sheeting and blue painters tape. First apply a single strip of blue painters tape along the desired spray line, and then tape up your plastic sheet to give you AMPLE overspray protection in all directions of your application area. Always err on the side of over coverage vs under coverage.
Prep your surface
Now that your work area is prepped, you will need to condition both the paint and the plastic to accept the Raptor Liner to you adventure van. This includes lightly sanding your paint and spraying an adhesion promoter to your plastic trim pieces. Below is guidance for both of these steps:
Sand your paint
Yes, you have to do this! Take your brand new van and lightly scuff the clear coat paint wherever you want to apply Raptor Liner with light duty 180 grit sandpaper and wipe clean with isopropyl alcohol.
Apply adhesion promoter
This is a step that you absolutely cannot skip. Without this, you will not get proper adhesion to your plastic trim pieces and over time your Raptor Liner will peel off. Trust us – it WILL peel! Spray two coats of the adhesion promoter on all of the plastic trim pieces and let it dry for at least 10 minutes between each coat and applying the truck bed liner. Each spray can covers 32 square feet of surface area, so 2-3 cans is enough for most van builds. Don’t worry if you get overspray of adhesion promoter onto areas of paint if you will also be applying Raptor Liner to those areas.
Spray Raptor Liner
Once you have your paint scuffed and your adhesion promoter applied to the plastic, you are 90% done with the job and are ready to go with the fun part! Get your air compressor and hose connected and set up. You will mix one cup of hardener into one bottle of the urethane based Raptor Liner, and don’t worry, they leave you enough room in the bottle for this extra volume! Put the cap back on and shake well for at least two minutes to ensure proper mixing. When the contents are fully mixed, take the cap off and screw the bottle directly the to applicator gun. With your air compressor on, start with a test splatter and make sure you like the spray pattern. If you want a finer or coarser finished texture, now is the time to tighten or loosen the spray tip.
Work your way around the van and spray all of the areas you have taped off and prepped. Be sure to keep the spray gun ~18” away from your van at all time to ensure an even looking finish. You will apply two coats of raptor liner with at least one hour dry time between coast. Your second coat will be dry to the touch in about an hour, but will not fully cure for 5-7 days. We recommend waiting for a time where you will not have to drive your van for at least two days after application while your coating more fully cures.
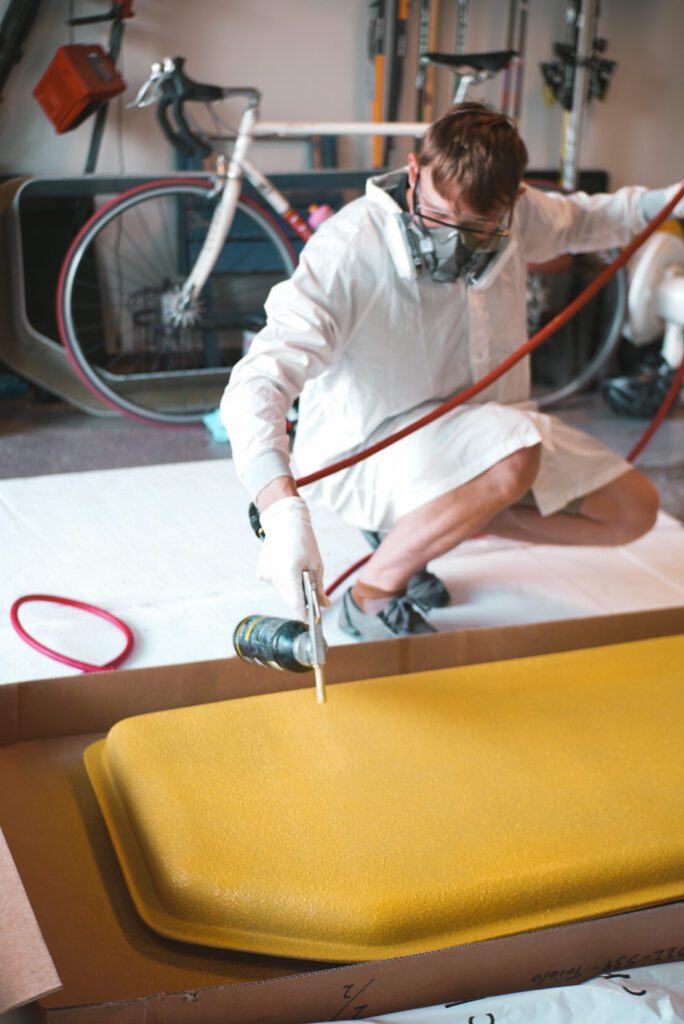
A Note on PPE
Raptor Liner can be a messy product to deal with. We recommend the following personal protection equipment (PPE) during the application process.
- Rubber gloves
- Safety goggles
- 3M mask or respirator
- Long work clothes or a painters outfit – something you can get dirty!
How to get raptor liner off / clean up
Laquer thinner is the only product that can handle the clean up of urethane based Raptor Liner and similar truck bed liner products. Neither soap and water, nor alcohol based cleaners, will remove Raptor Liner, so don’t even bother trying. Application is a messy process and messes are an inevitable reality. Having some lacquer thinner on hand to clean up your overspray of Raptor Liner is always a good idea! Better to have it and not need it than to need it and not have it!
Recommended Next Reading:
- Ford Transit Exterior Upgrades
- Campervan Conversion Weight Breakdown
- Step by Step: How to Convert a Camper Van
Thanks for being here! Happy building!
Eric + Colby
✉️ Join our mailing list for more content!
🙏🏽 If you are looking for more 1:1 van build help, we are here to help via Consulting or Travel Van Building.
[Start Here] Beginner Guides: